This month (May, already), sees the return of a male themed project for the Tech4Stampers bloghop.
Its great that it is the start of the brand new Annual Catalogue, but that is also a bit of a dilemma. I have only purchased a small amount of the new stamps and dies, although I have refreshed all my coloured inks and cards. If you would like a copy of the catalogue, then send me a message (UK ONLY)
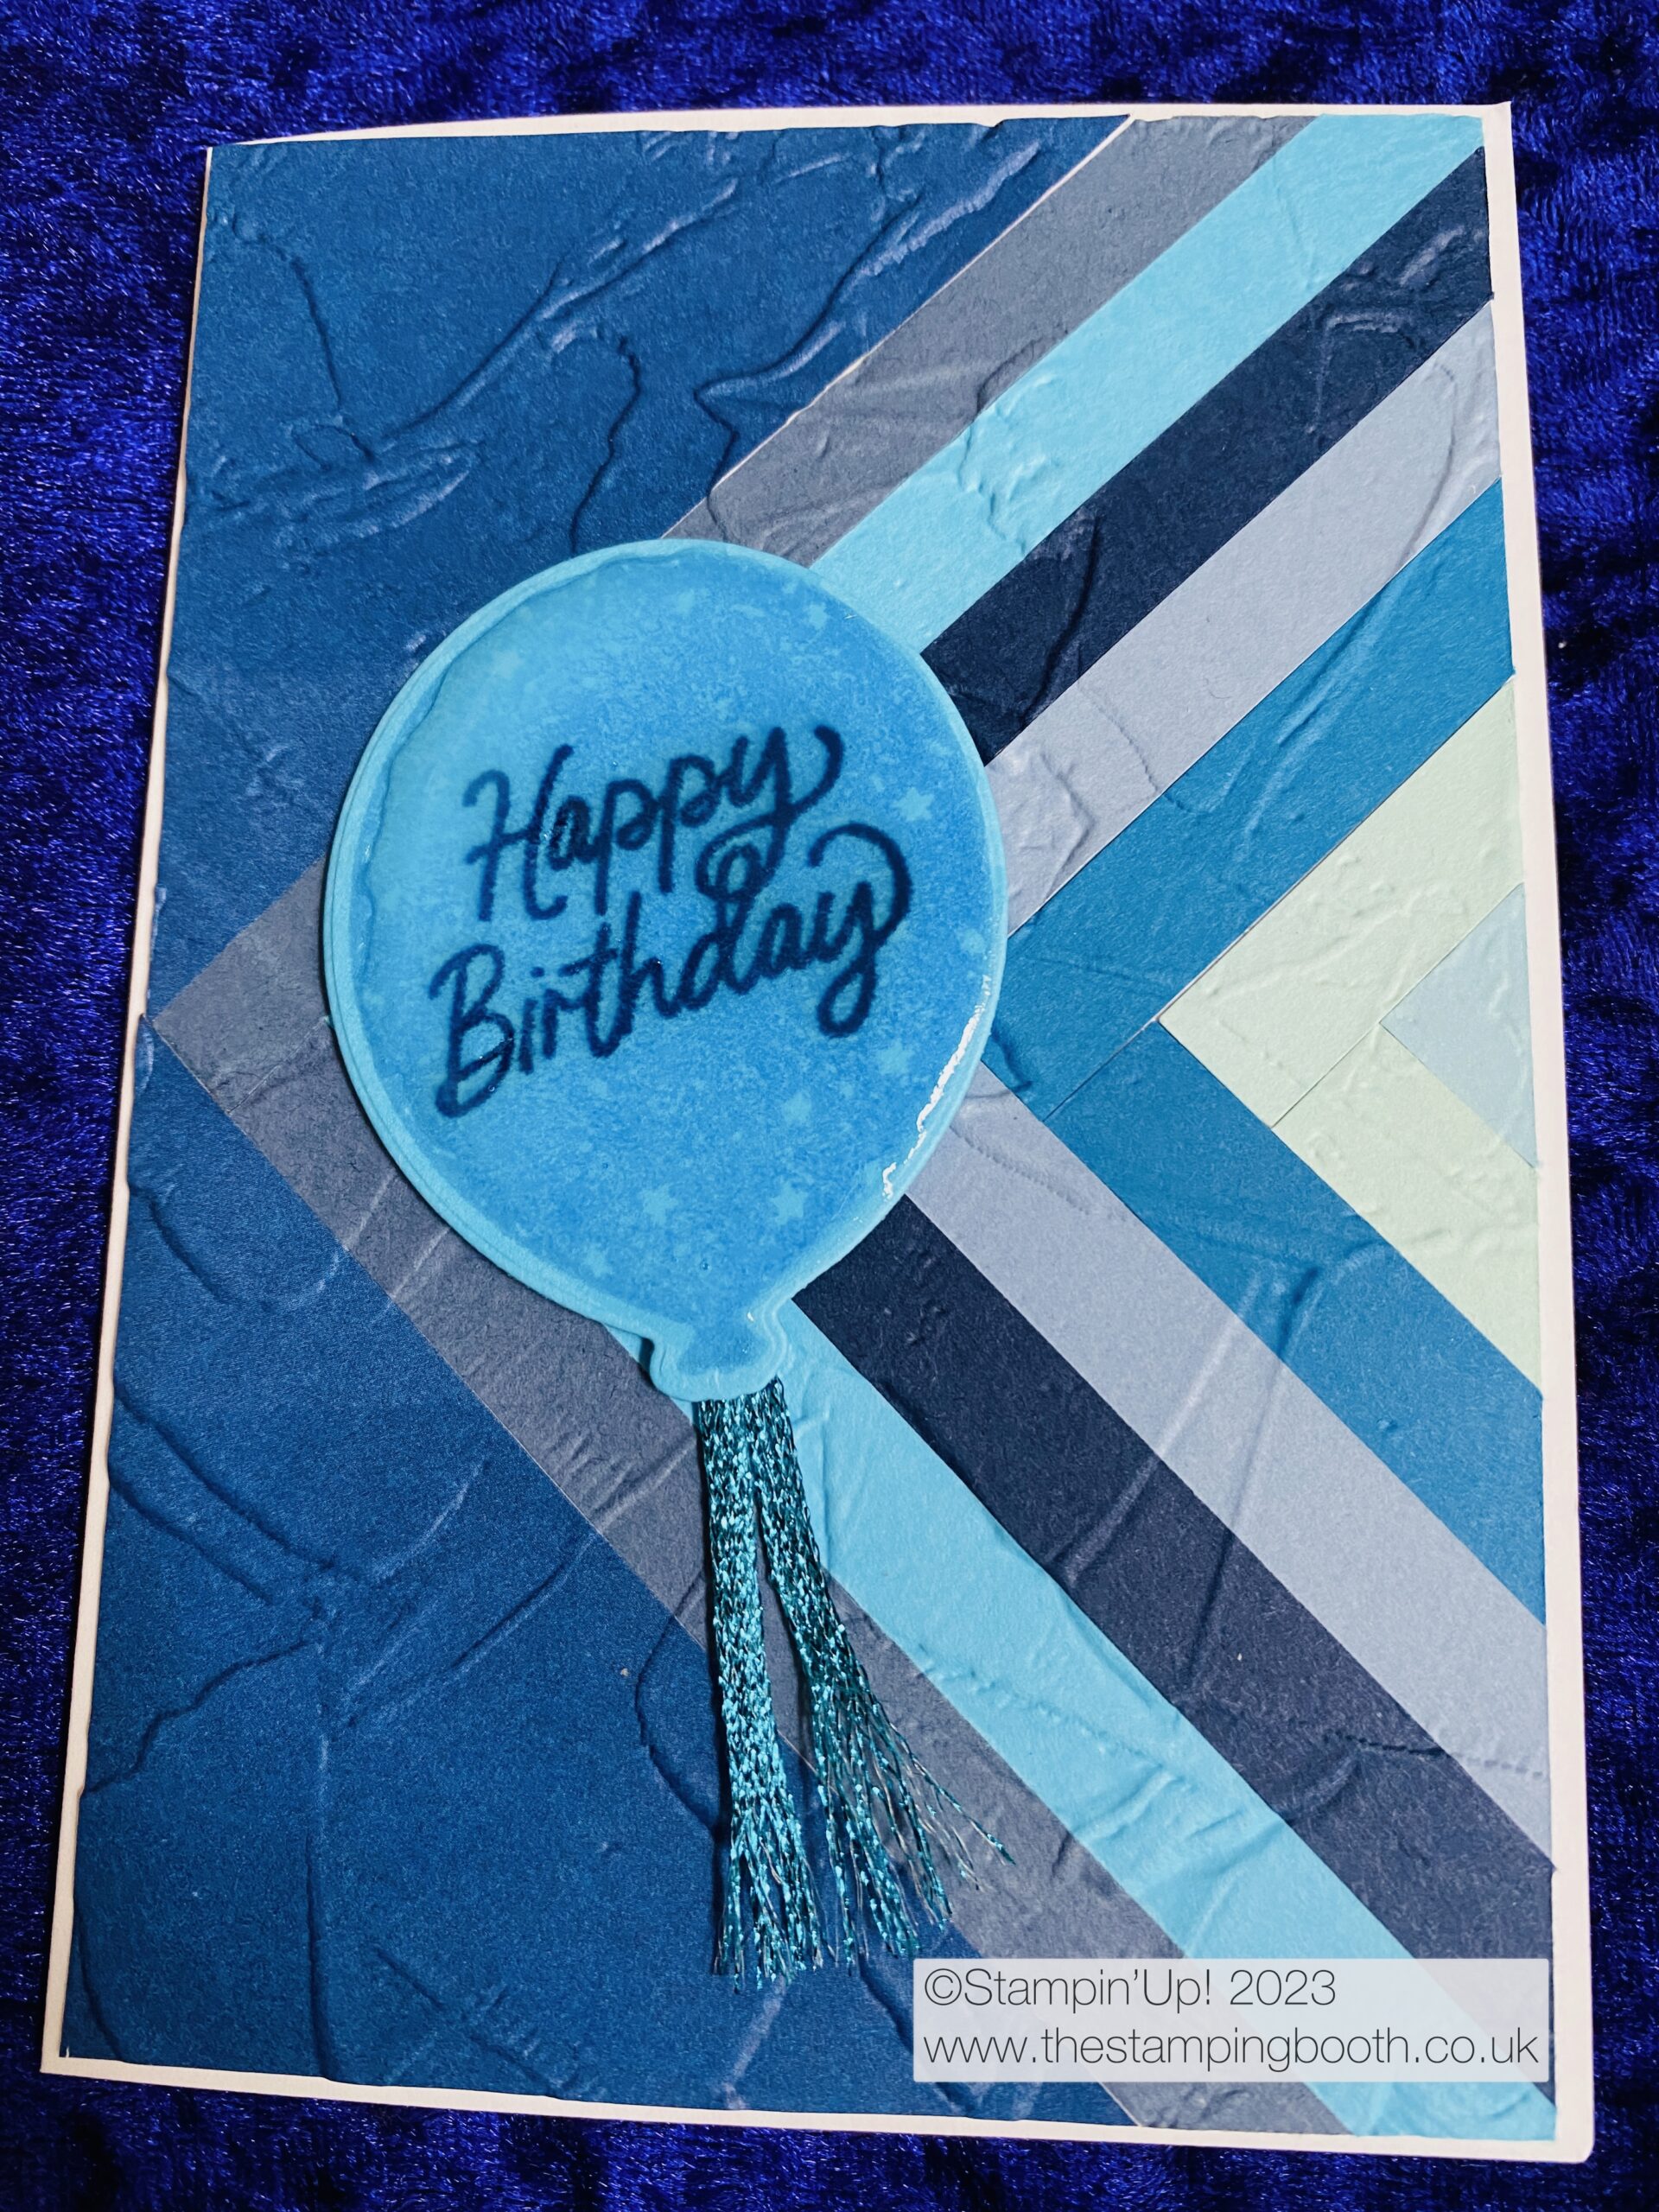
With this in mind, I decided to use lots of blues for my card, including several new or returning ones…..Misty Moonlight, Boho Blue, Azure Afternoon, alongside all my existing blue tones.
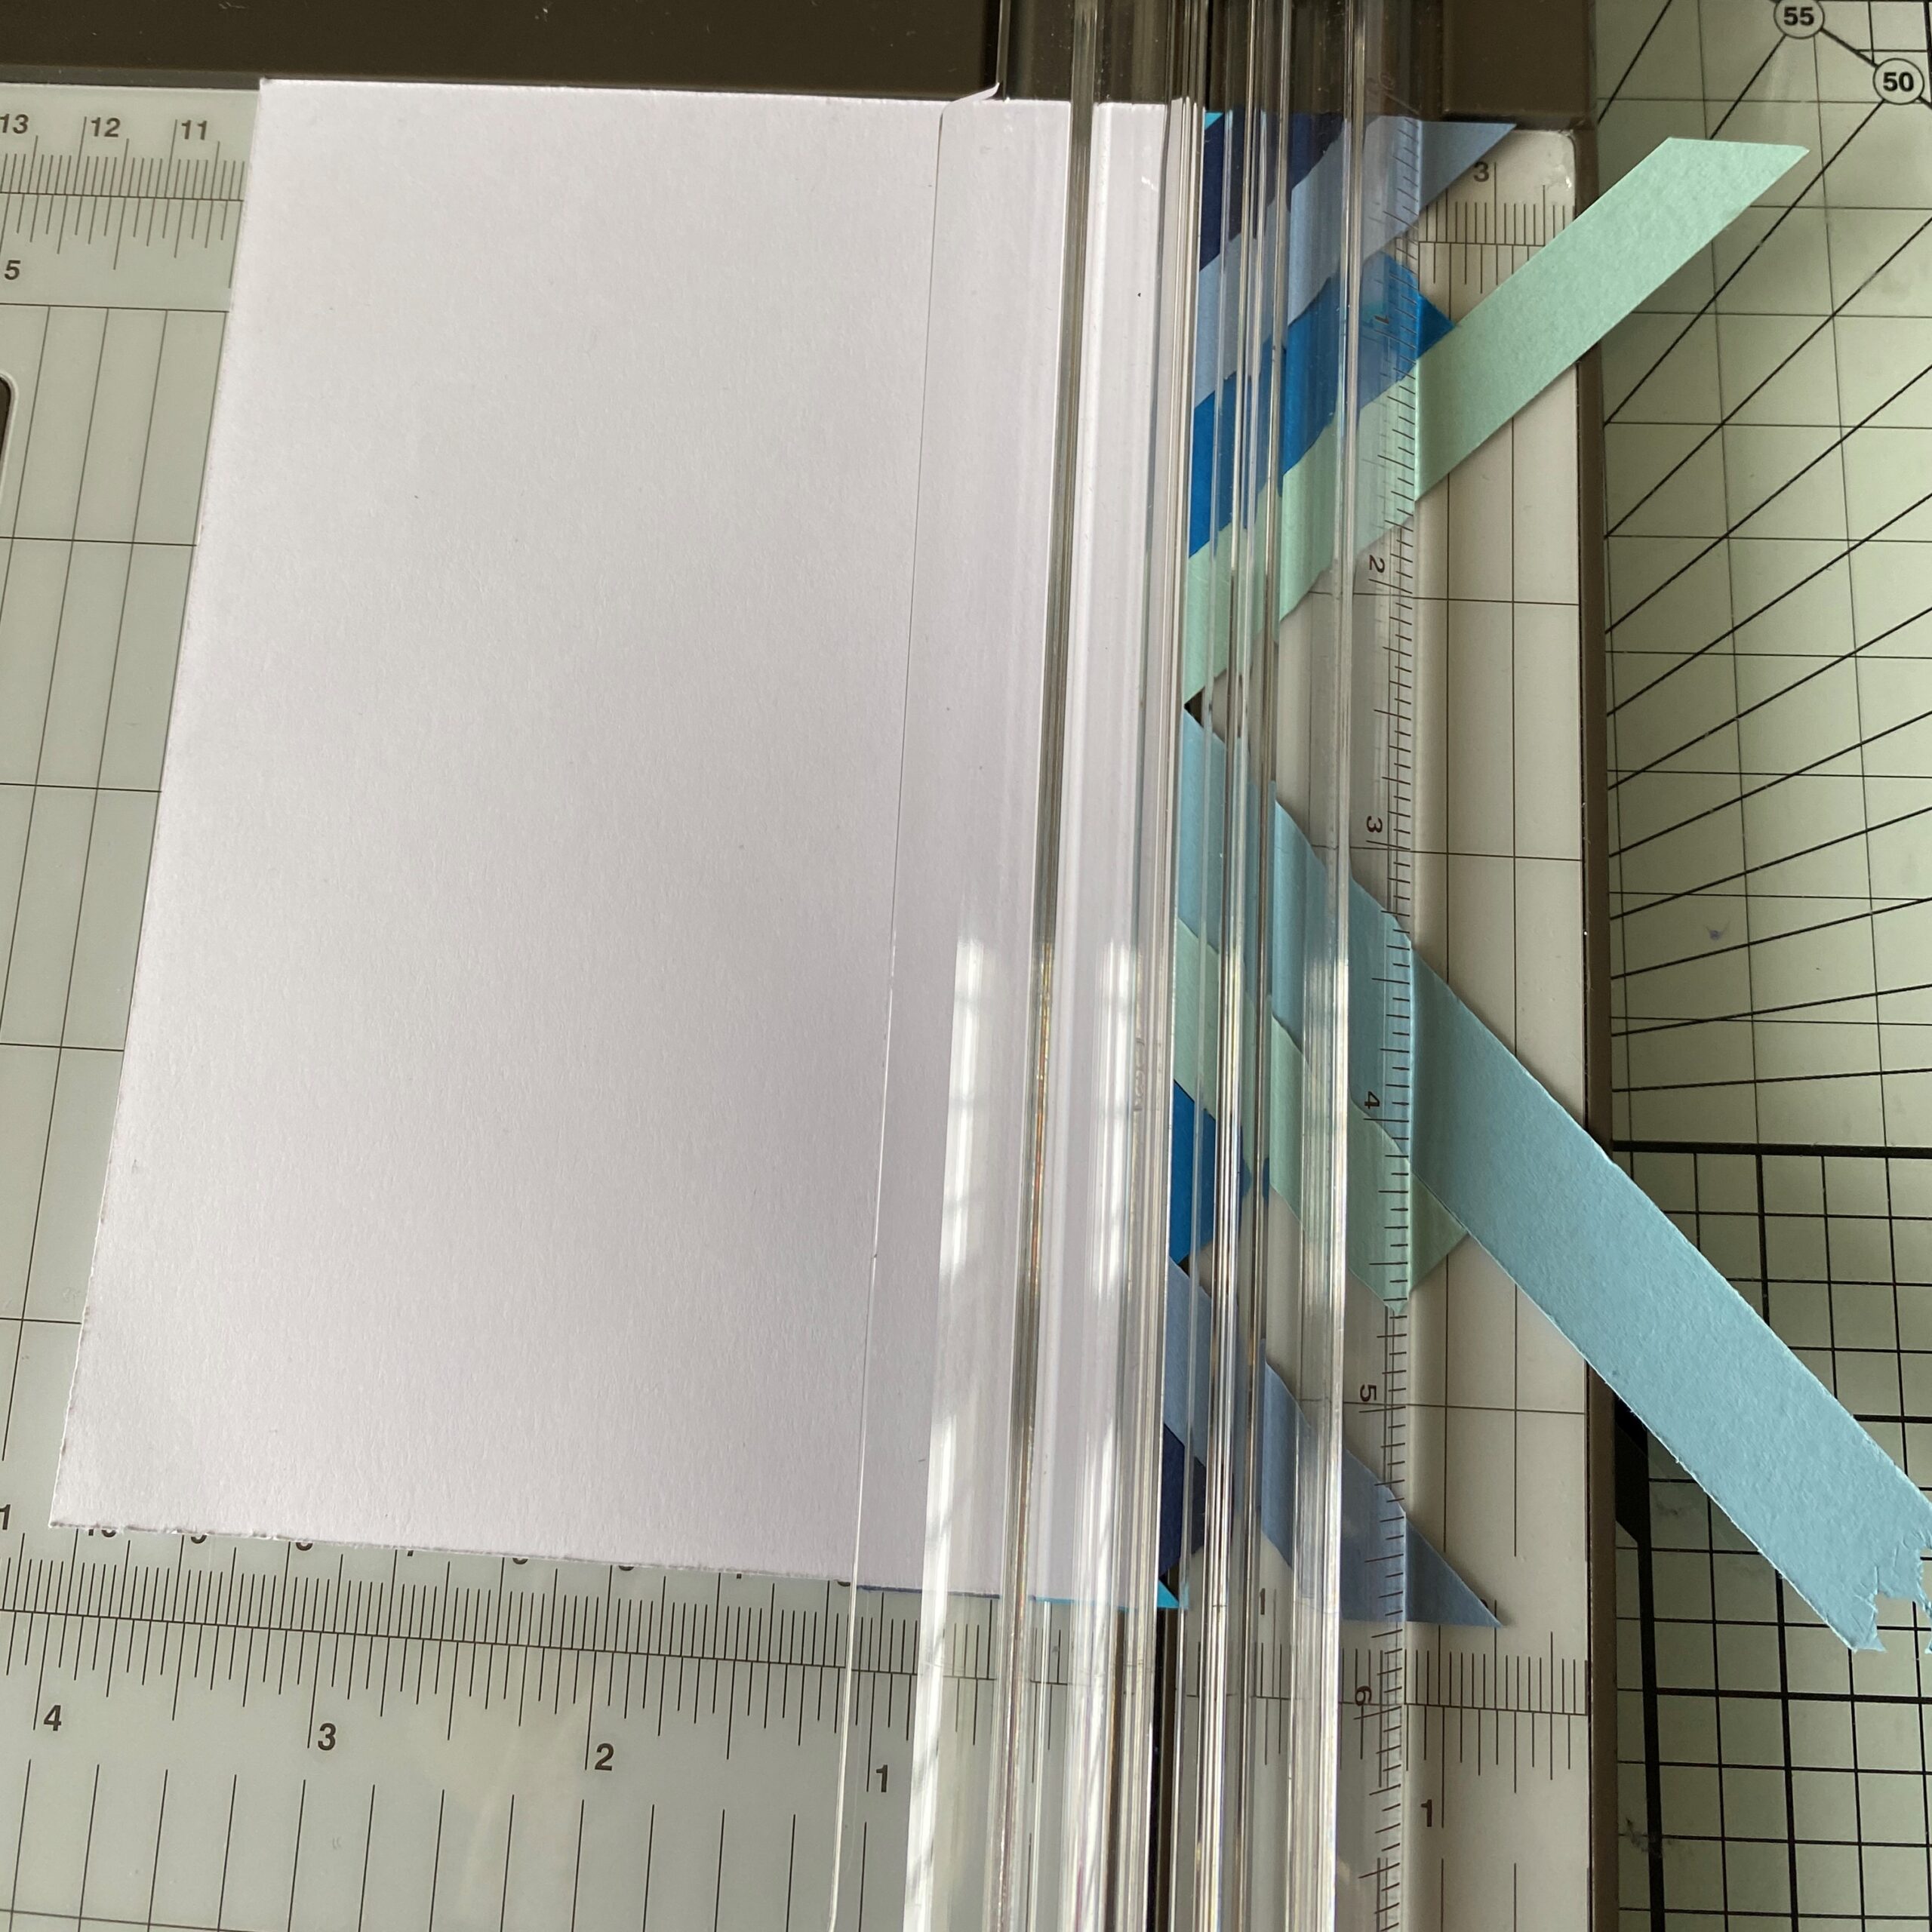
Whenever I cut a card layer, I am always left with thin strips of card and decided to use some of these up.
Firstly, I measured 7.2cm from the corners on the left hand side (both along the top, bottom and left hand edge and marked these places with a tiny pencil mark.
By faintly joining these marks, again in pencil, I had a guide to help line up the card strips evenly.
I then carefully cover the whole sheet with a sheet of adhesive (I actually still have the old Sizzix sheets that SU used to sell, so I’m using them up, but SU’s own are available on page 138 of the catalogue).
I removed the backing and then carefully started laying my strips along the inside edge of the lines that I had made, making a chevron effect. (Note; once the backing is removed you can easily see through the adhesive)
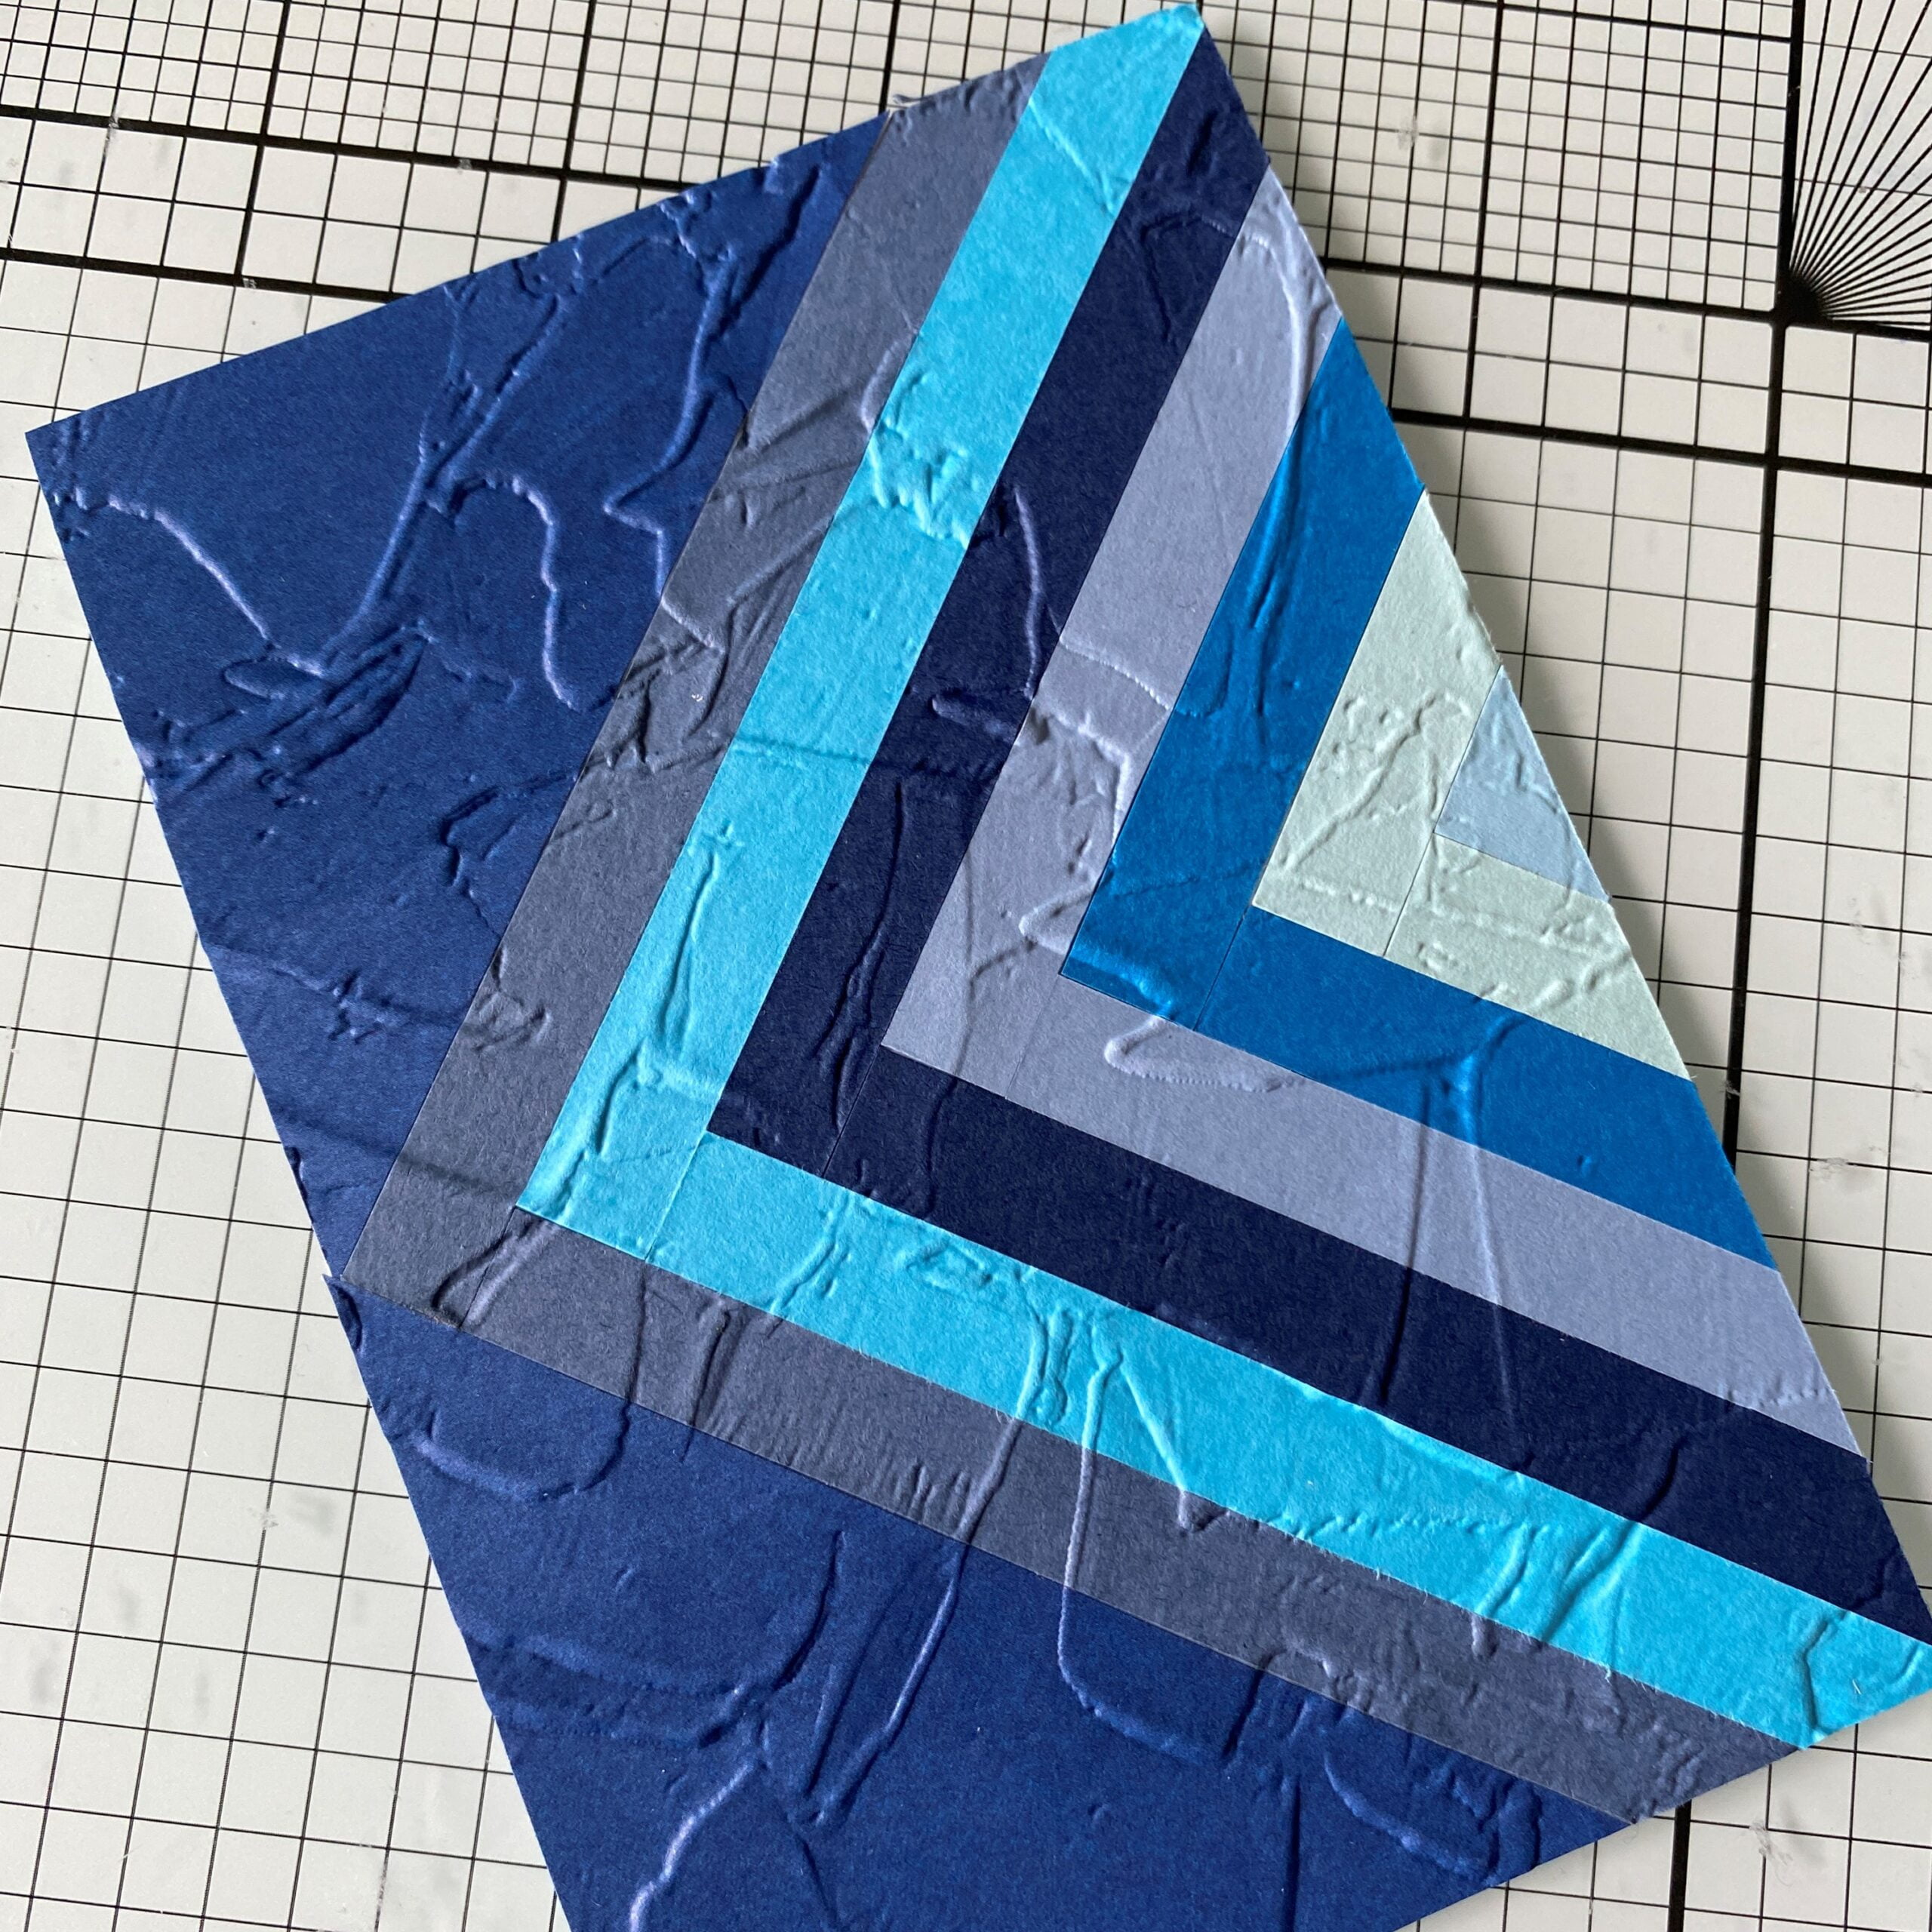
Once the chevrons were complete, I used my trimmer to cut off all the overhanging strips. I then cut larger triangles to cover the remaining card stock and trimmed from the back to fit my card.
I then ran it through my die cutting machine using the embossing plates and the Painted Texture embossing folder, which gave it some relief from the ‘flatness’!
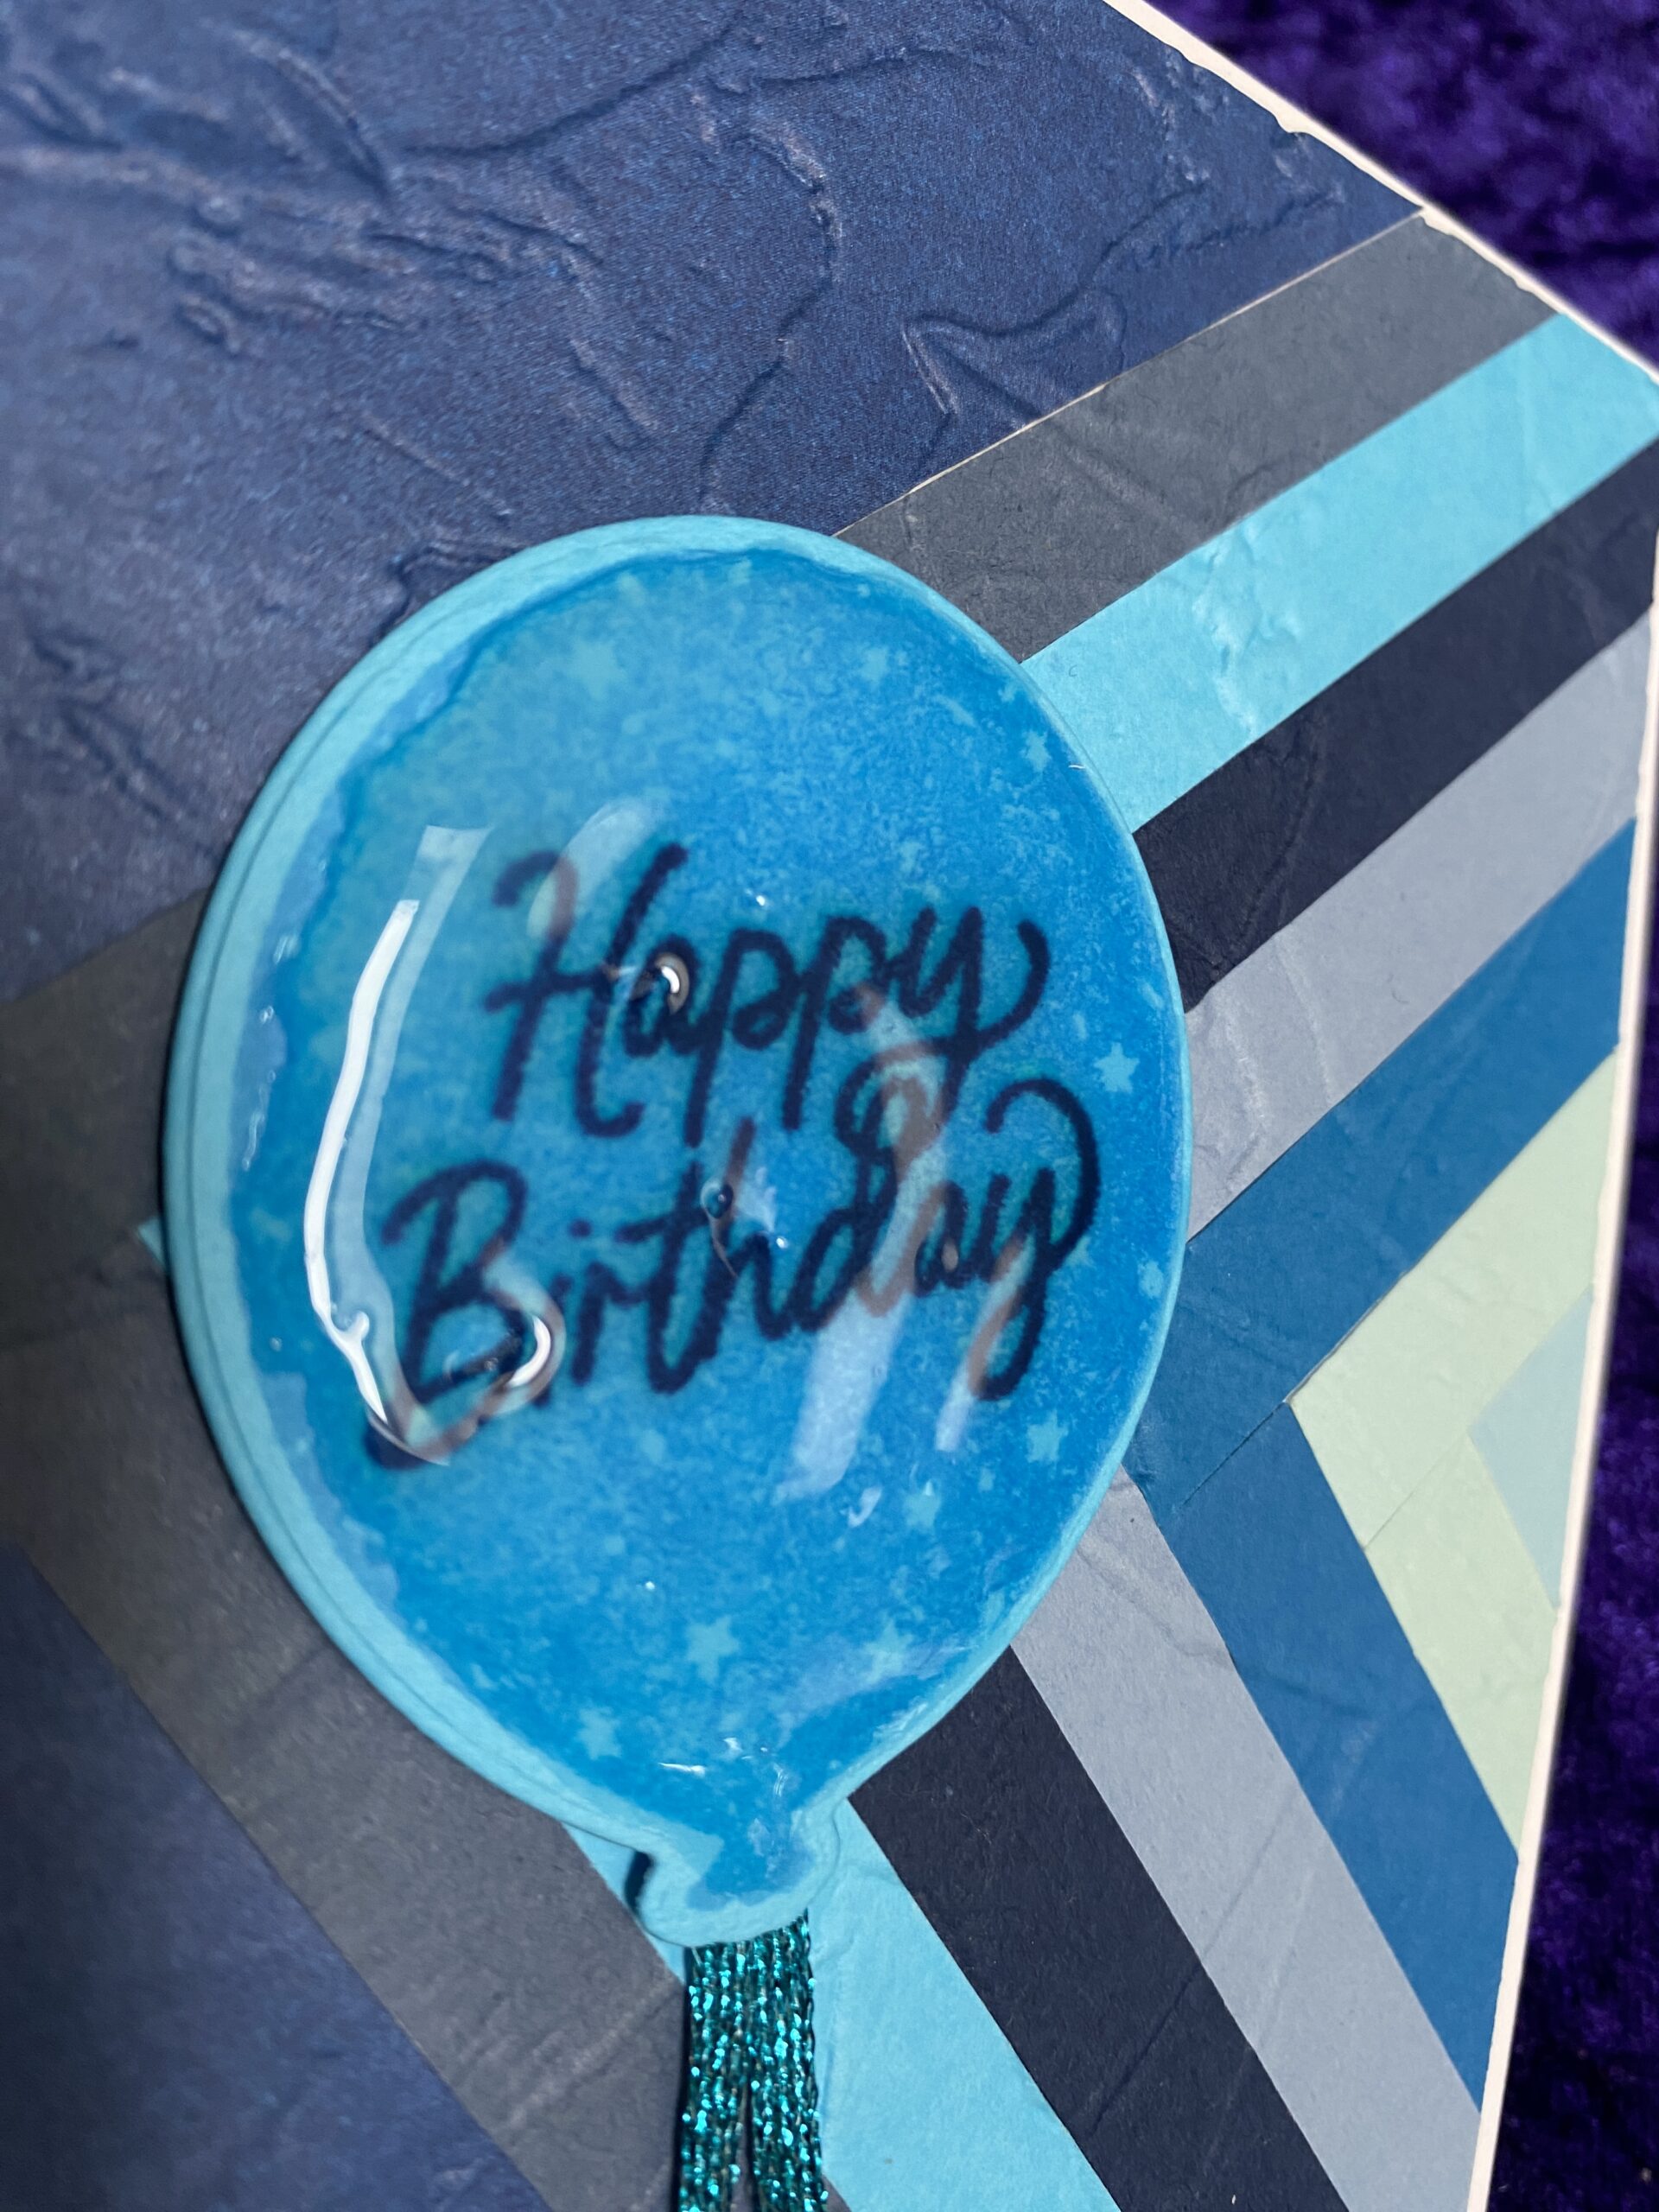
The balloon is from the brand new Beautiful Balloons stamp set as is the greeting. This was then cut with the coordinating dies.
I used some of last years metallic woven ribbon (now retired) for a ‘tail’ on the balloon.
To finish off I used some Glossy Accents (not a Stampin’ Up! product) to give the balloon a lovely shine, and mounted the whole thing onto a basic white card base.
The finished card;
This is a great way to showcase all the different shades of colour available from Stampin’ Up! and also a great way to use all those strips of card that non of us want to throw away!
Thanks for looking and I hope you will hop over (by clicking the links below) and see more inspiration for a For the Men project.
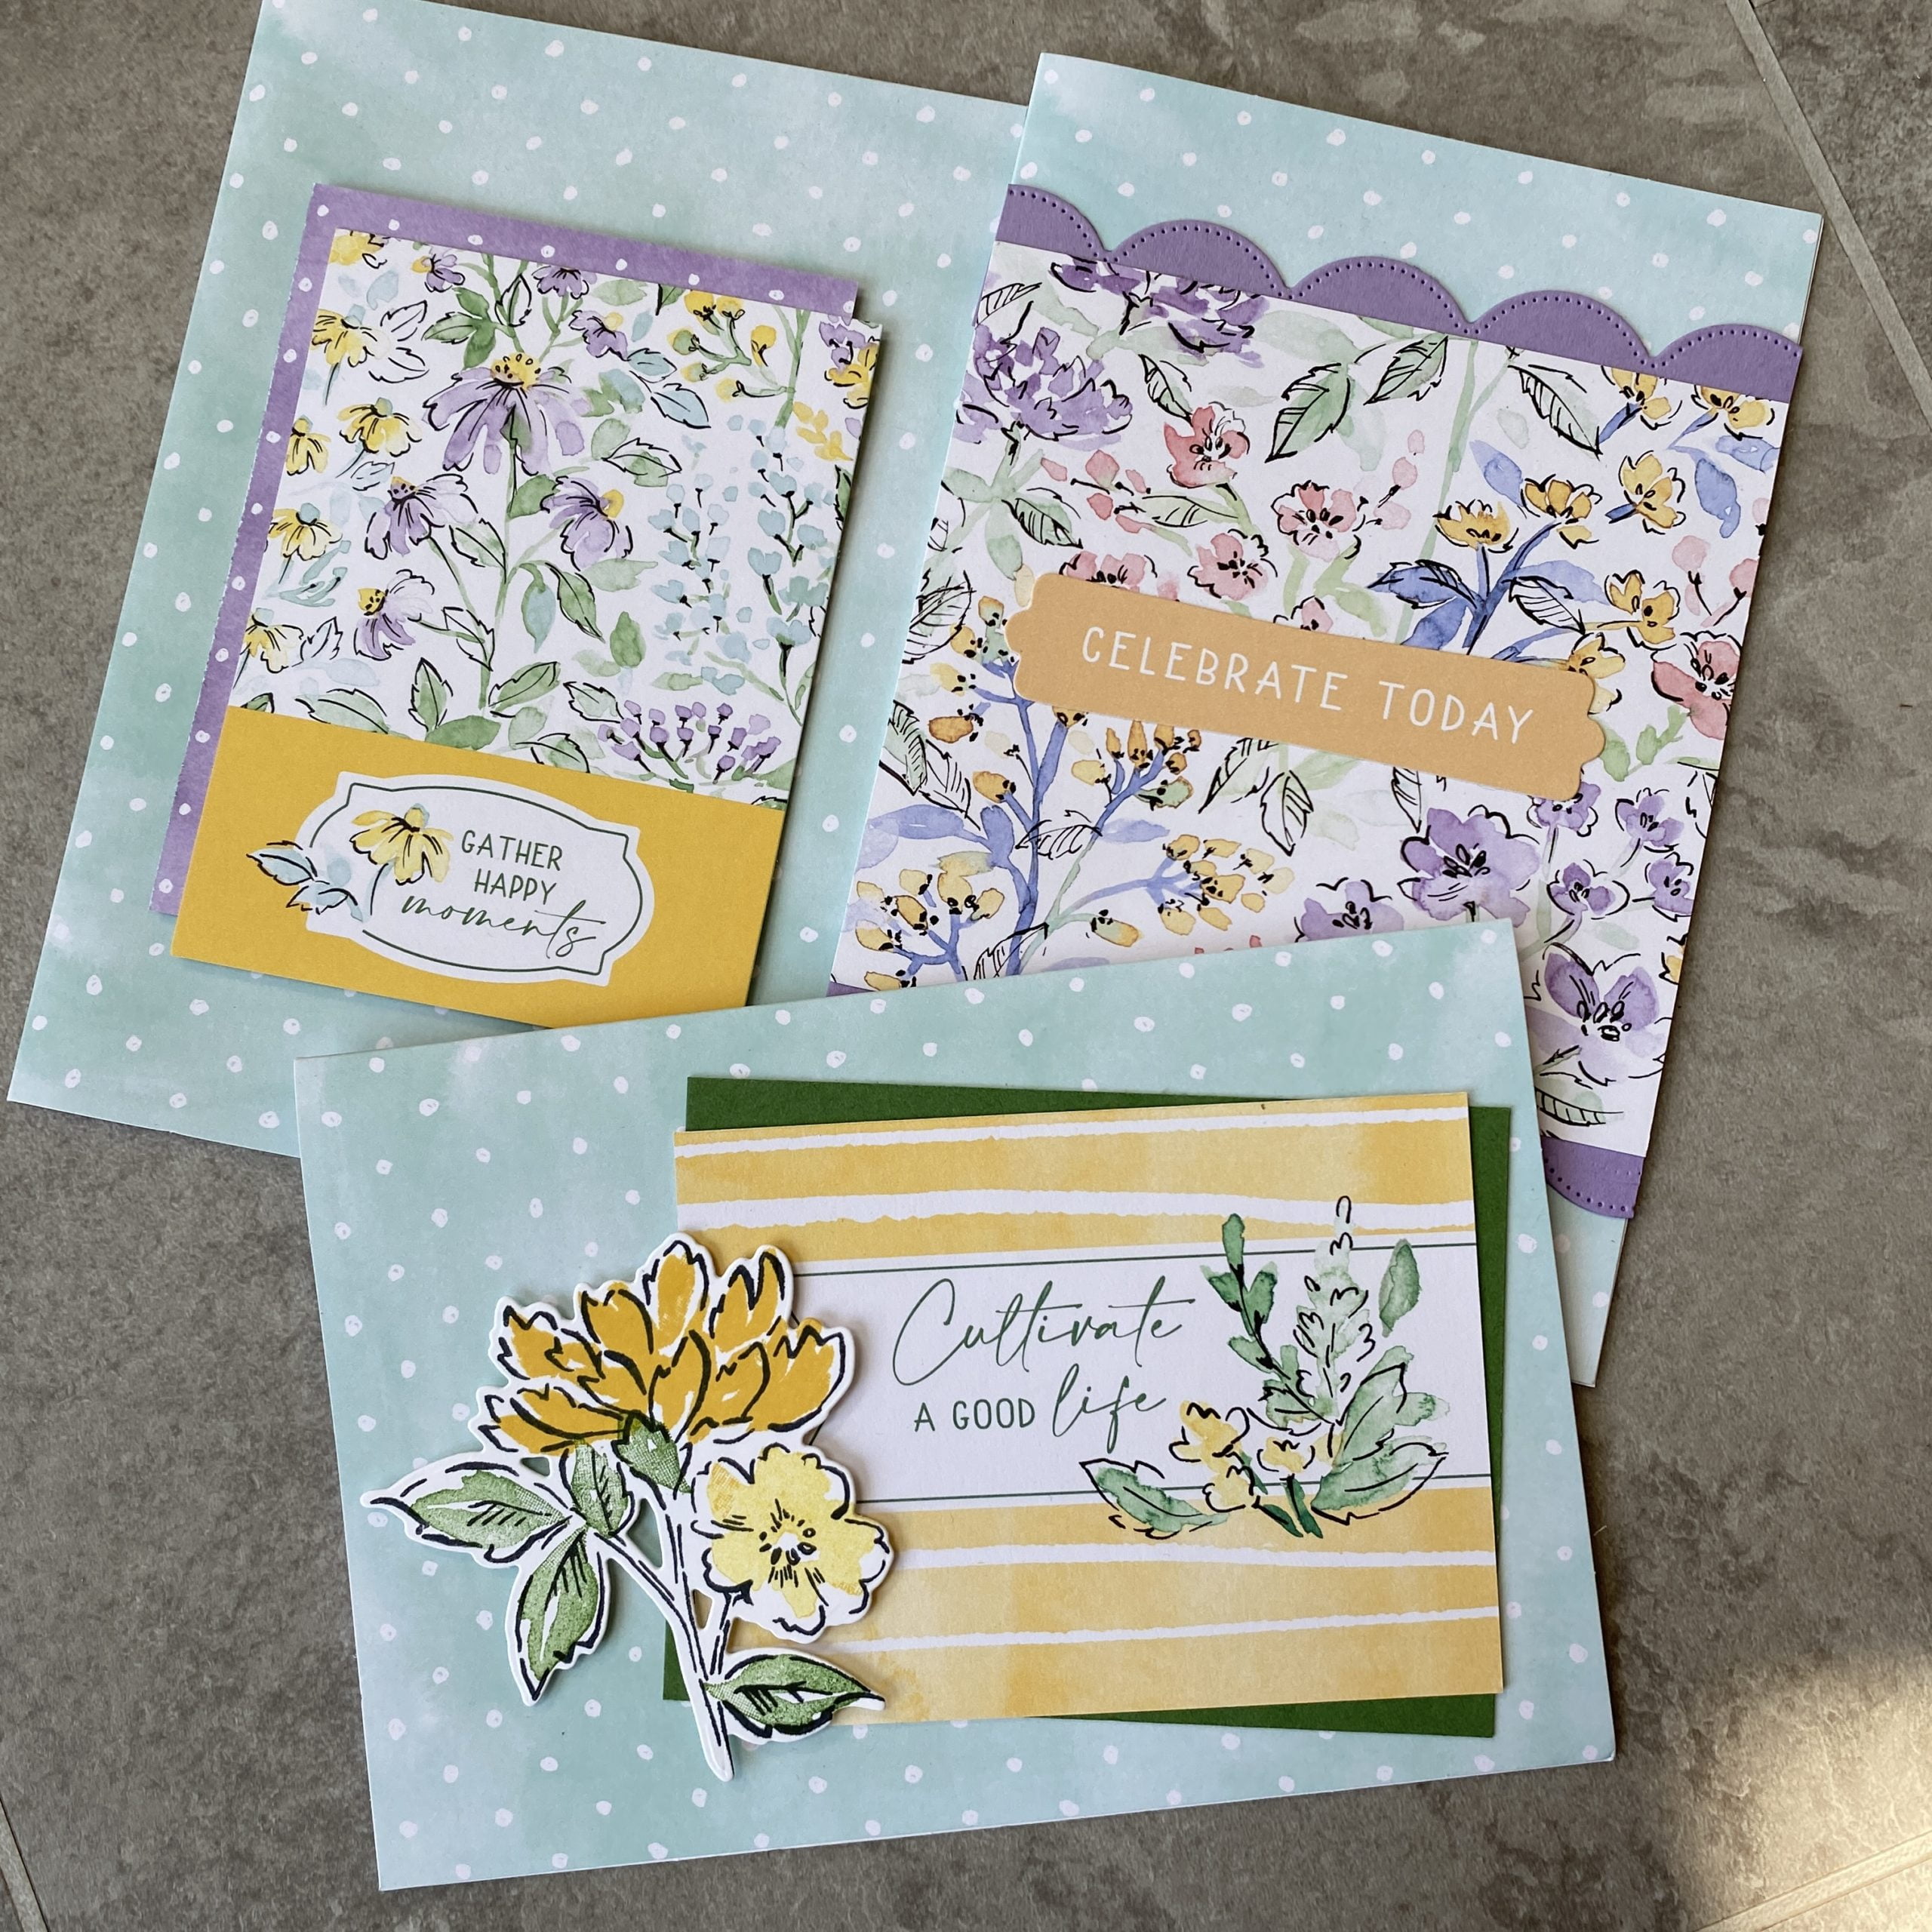
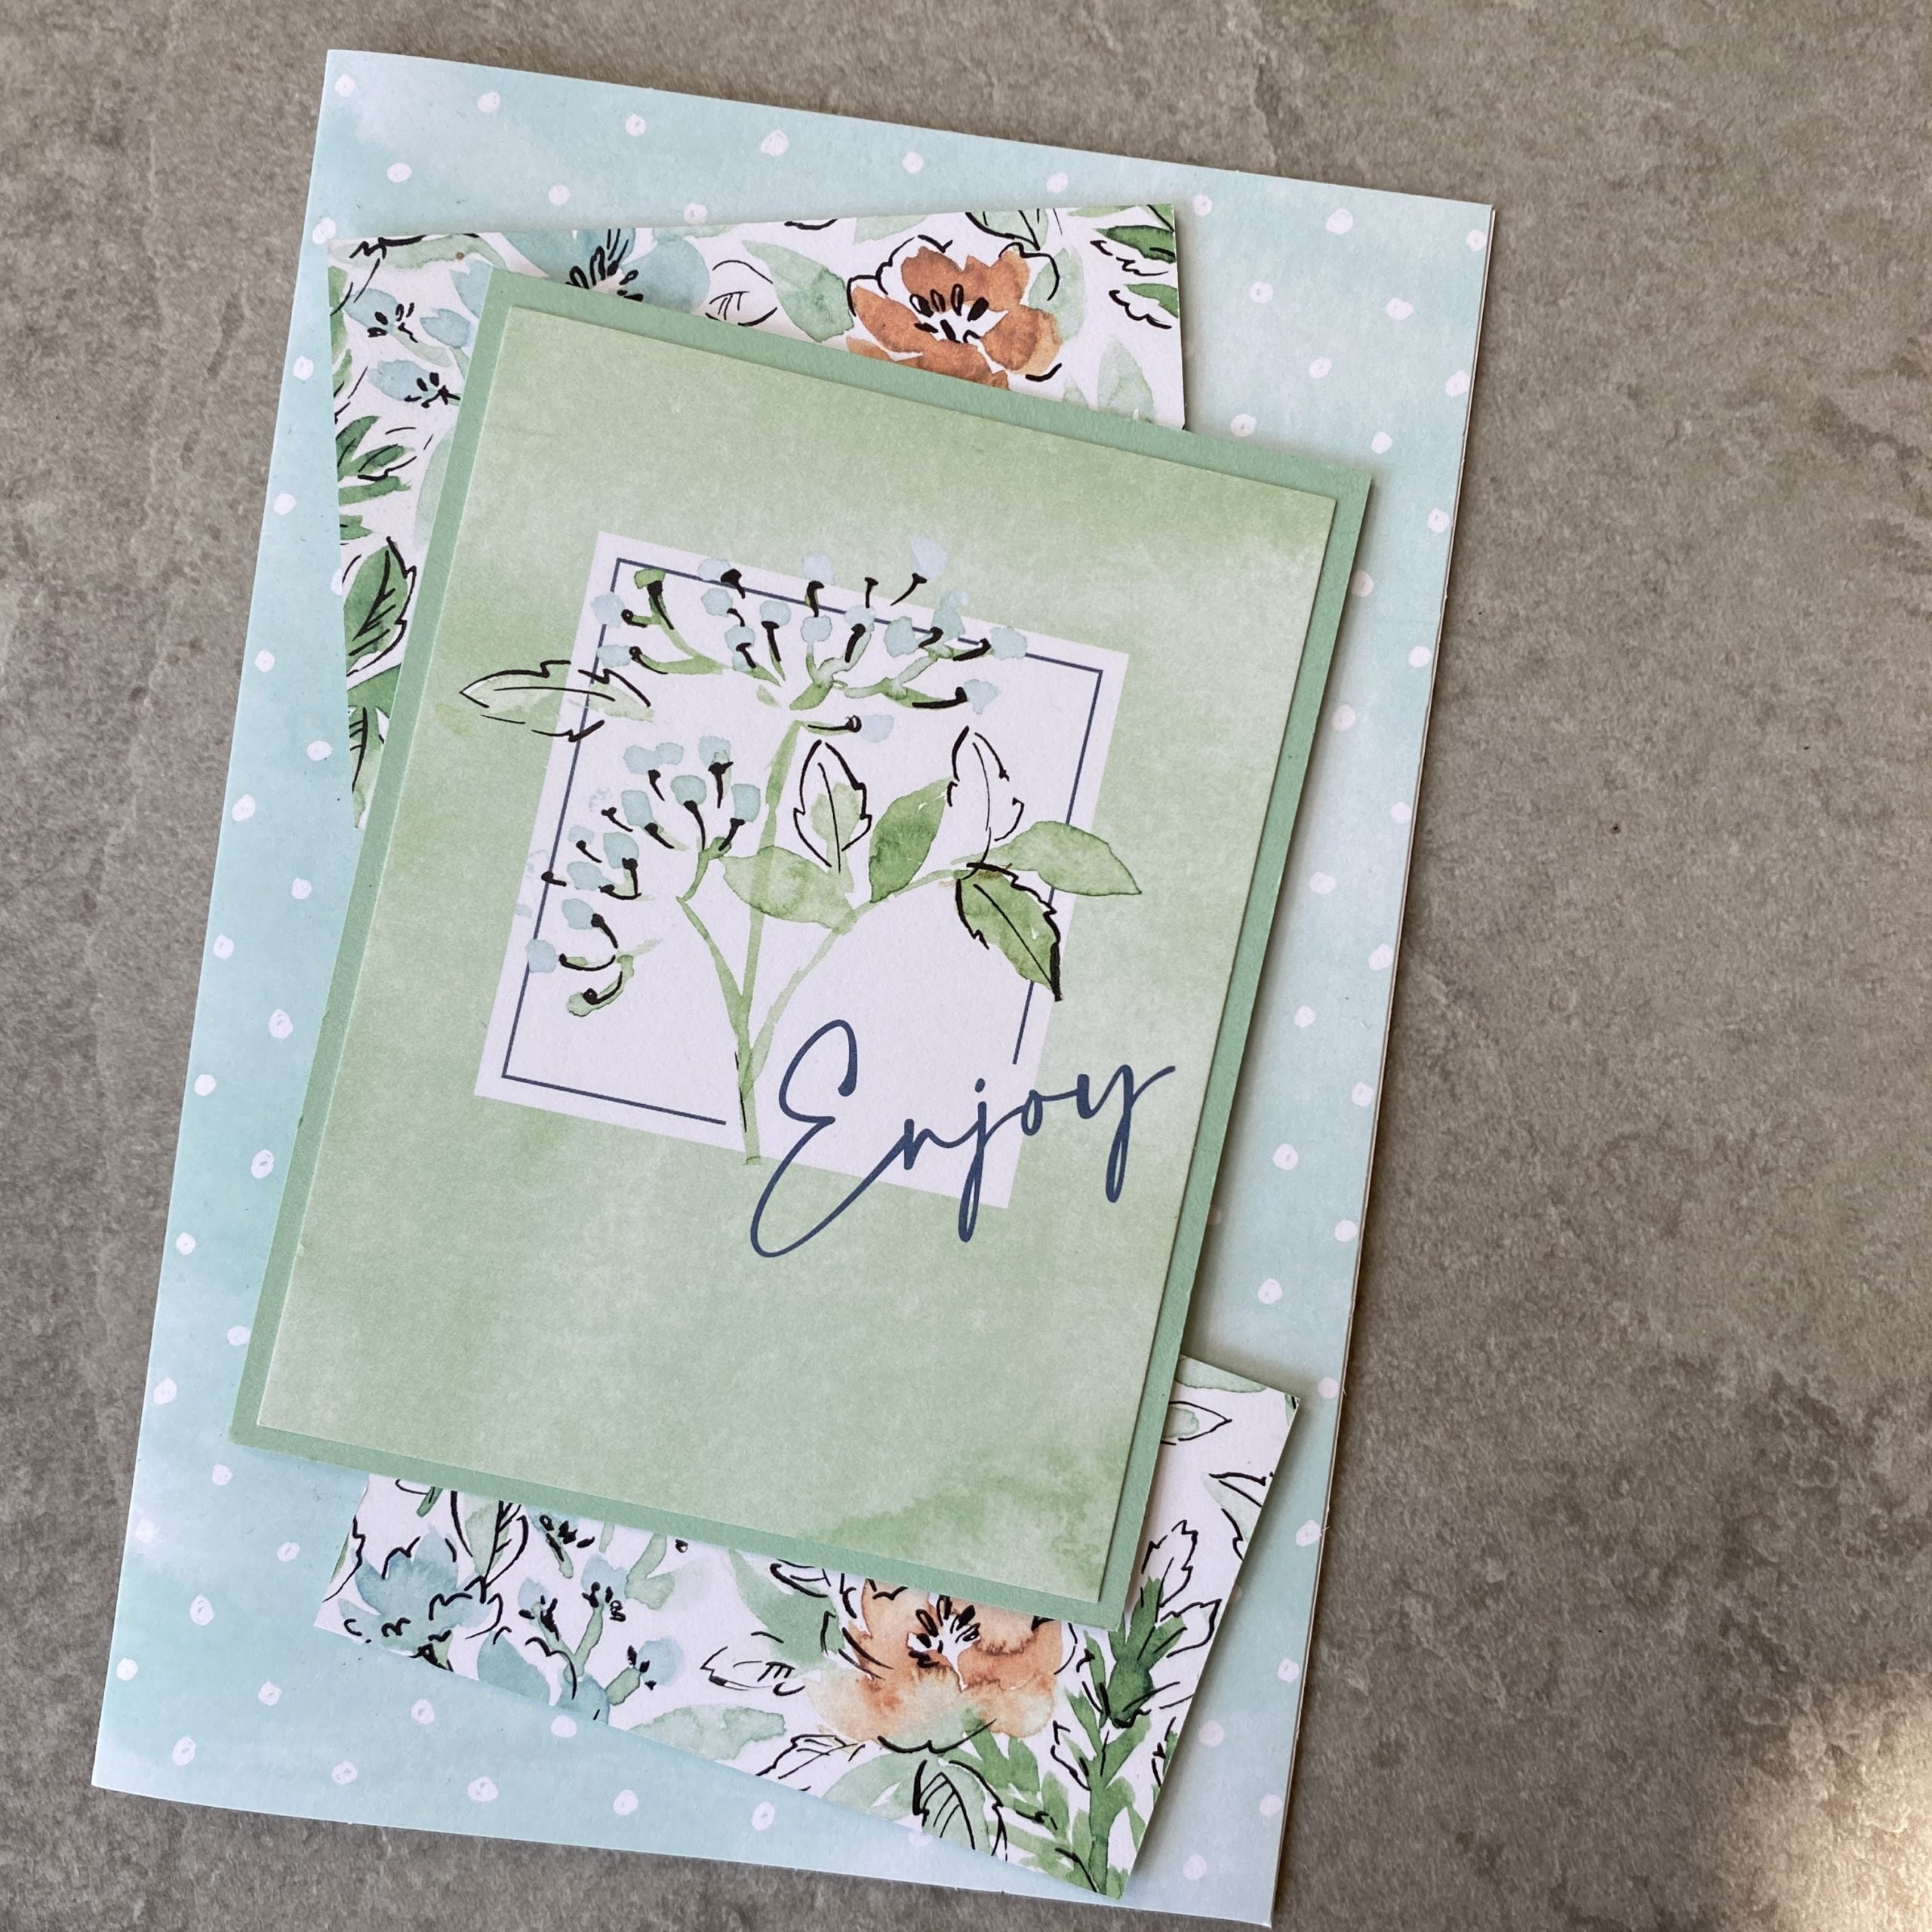
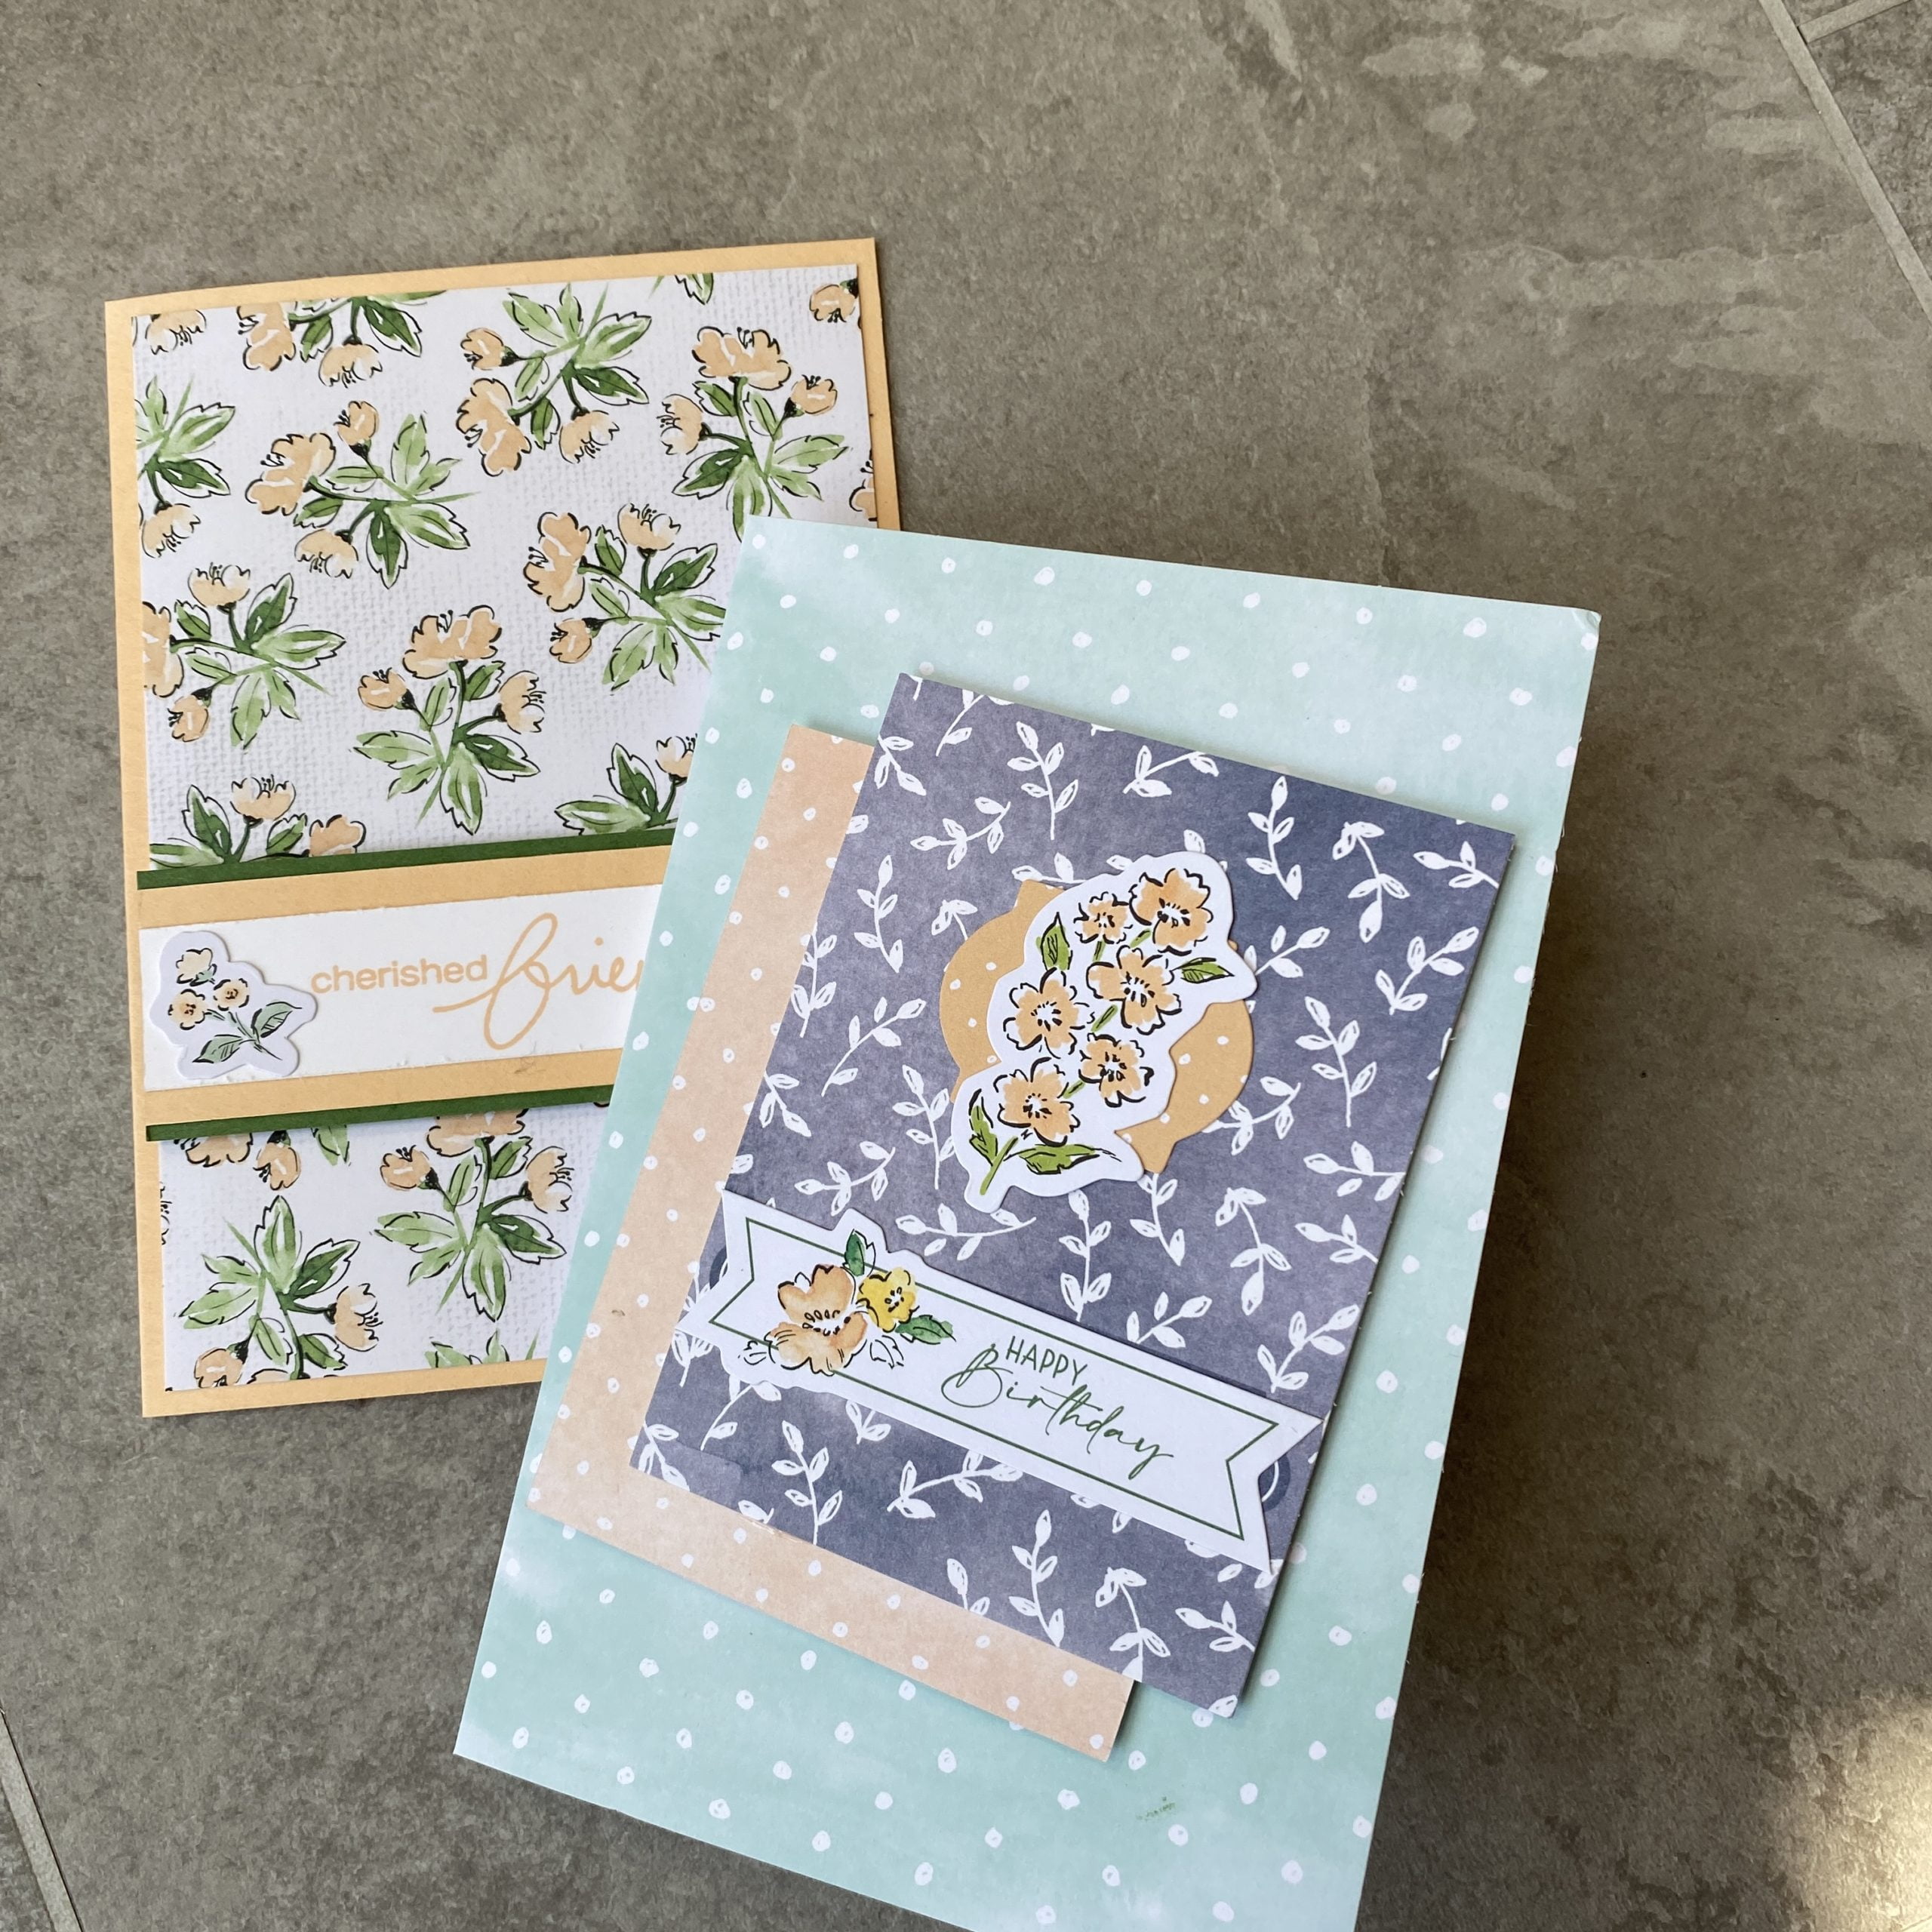
Earlier in the summer, I ran a workshop using the lovely Hand-Penned Petals Memories & More card pack. If you haven’t seen or used memory & More packs, they are great for some quick and easy cards as well as for using for scrapbooking and using in the scrap book pockets – a quick and easy way to scrapbook!
To Purchase the Memories and More card pack , click here
You get so much…
50 printed card elements – 36 3”x4”, and 14 4”x6”.
4 sheets of stickers
And then you can get co-ordinating cards and envelopes;
You get 20 cards and co ordinating envelopes in this pack
To purchase The Hand Penned Petals Memories and More card blanks and Co-ordinating envelopes – this pack, click here
Anyhow, we had lots of fun and made our own cards using the supplies from these kits.
Here is a selection of some of the cards, and I still have loads more cards left over so can make plenty more!
Memories and More card packs were originally designed as an easy way to scrap book….Album, pre made photo pockets, and a variety of card packs to individualise as you wish. This is a great way of recording those precious memories, be it from a new arrival, a holiday or just for the fun of it. Below are some of what is available right now. Click on any of them to be taken straight to my shop!
I put my website into ‘maintenance back in May, and where has time gone? I’ve still been crafting – well, until I went on holiday mid June, but then I’ve had technical issues with the upgrade of my website, along with catching Covid which knocked me off my feet for a few days. So, these are actually cards I made prior to my holiday to Cornwall and some I have demonstrated on my Facebook page.
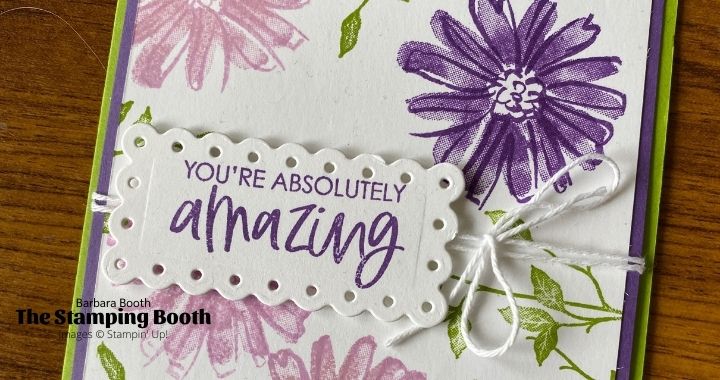
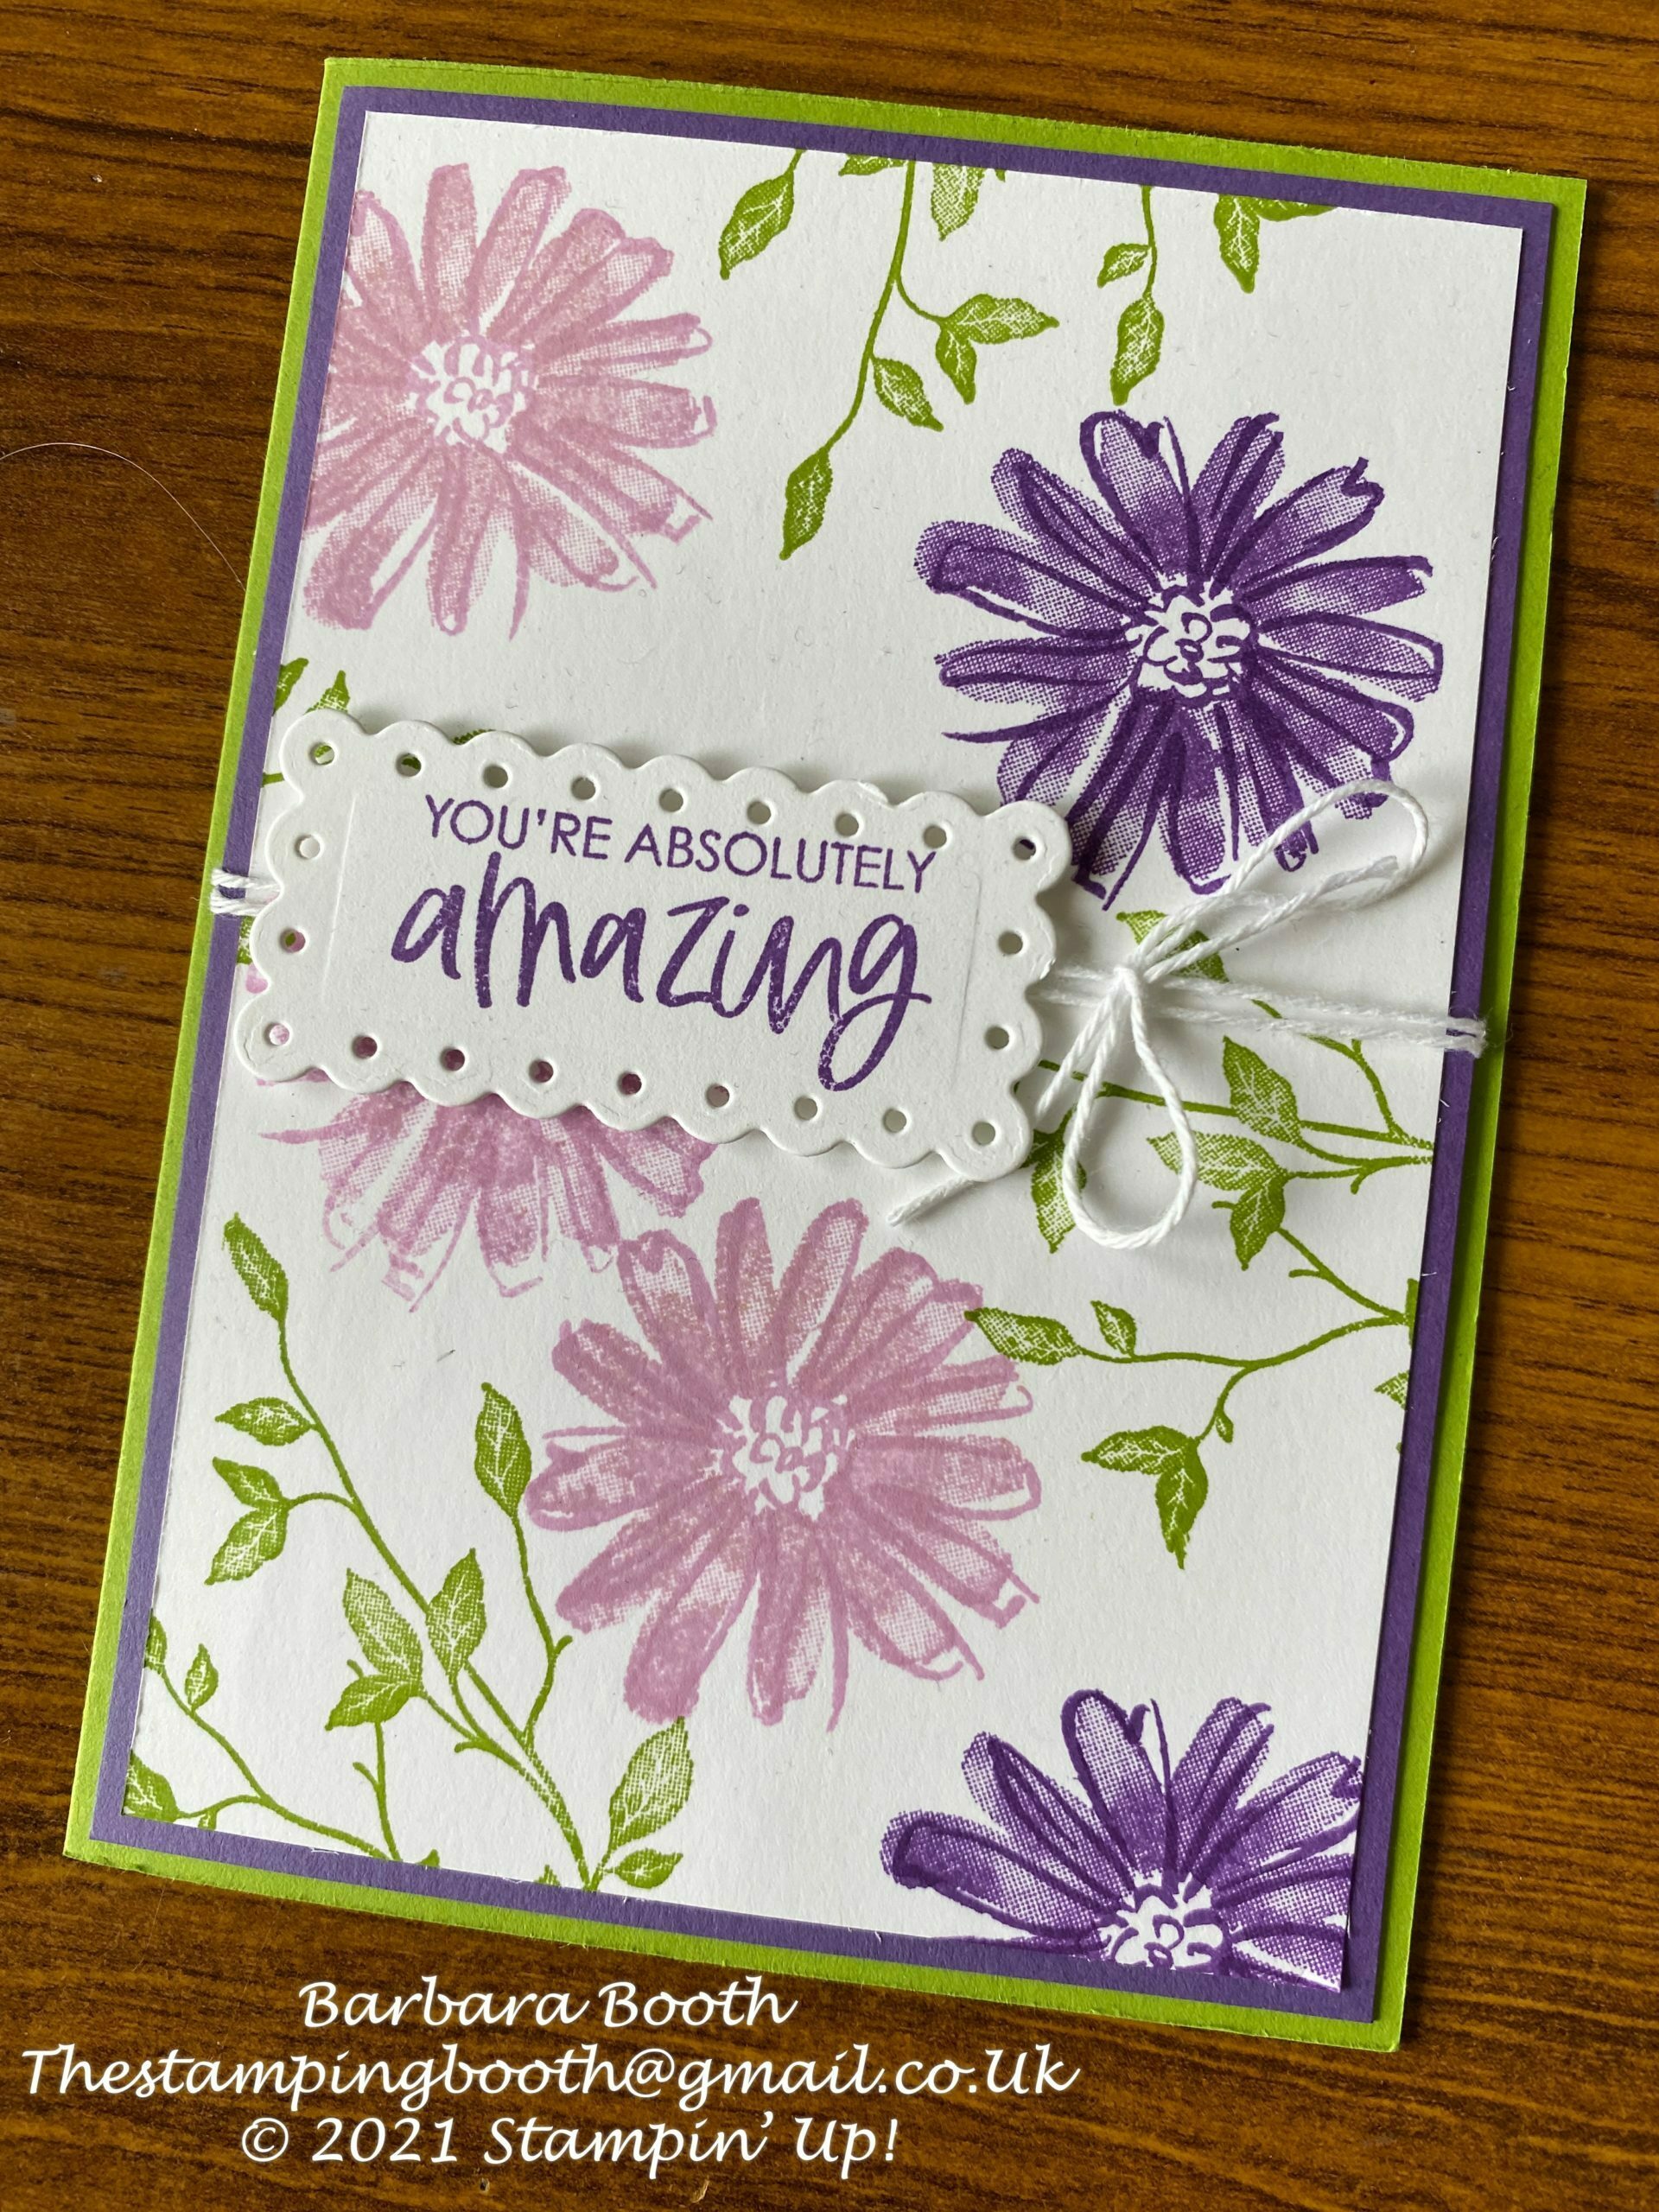
Color & Contour meets Very Versailles
I know…its flowers again! But, I love this set…so simple to use and so many colours possible…you can never make 2 cards the same!
This card used a base of Granny Apple Green, a layer of Gorgeous Grape and then stamping onto Whisper White – yes I’m not onto my basic white stock yet!!
I stamped the cards in Fresh Freesia and Gorgeous Grape and then used Granny Apple Green for the ‘vines which were from the Very Versailles set
I die cut the smallest Scalloped Contour die in white and stamped the sentiment from the Color & Contour set. After sticking the top two layers together, i wound some white bakers twine around before attaching the sentiment.
To finish off, I added a stamped image to the inside on a layer of white.
I love how these colours go together and give the card a real’pop, what do you think?
My lovely upline, Zoe Tant, showed a group of us (her) team members how to make this next card.
Its far easier than it looks, and is a bit like sticking a card within a card!
You will need;
Card base 23cm x 10.8cm scored at 14cm
Coloured card 22.8cm x 10.8cm scored at 14cm
Coloured card (layer) 10.5cm x 8.5cm
DSP (patterned paper) 10.2 x 8.2
additional dies cuts to embellish
To make;
Adhere the back of the largest piece of coloured card to the back of the base card at the hinge, leaving the front section ‘hanging.
Attach the DSP onto the layer, and then fasten to front of card.
Add your stamped and die cut images, remembering that the middle layer and back layer hang below the front, so what ever is placed in the centre or back may show. (I carefully stamped ‘friend’ so I knew you could see it fully from the front.
I used sentiments from Daisy Lane stamp set
This card works equally as well orientated on its side….why not have a go?
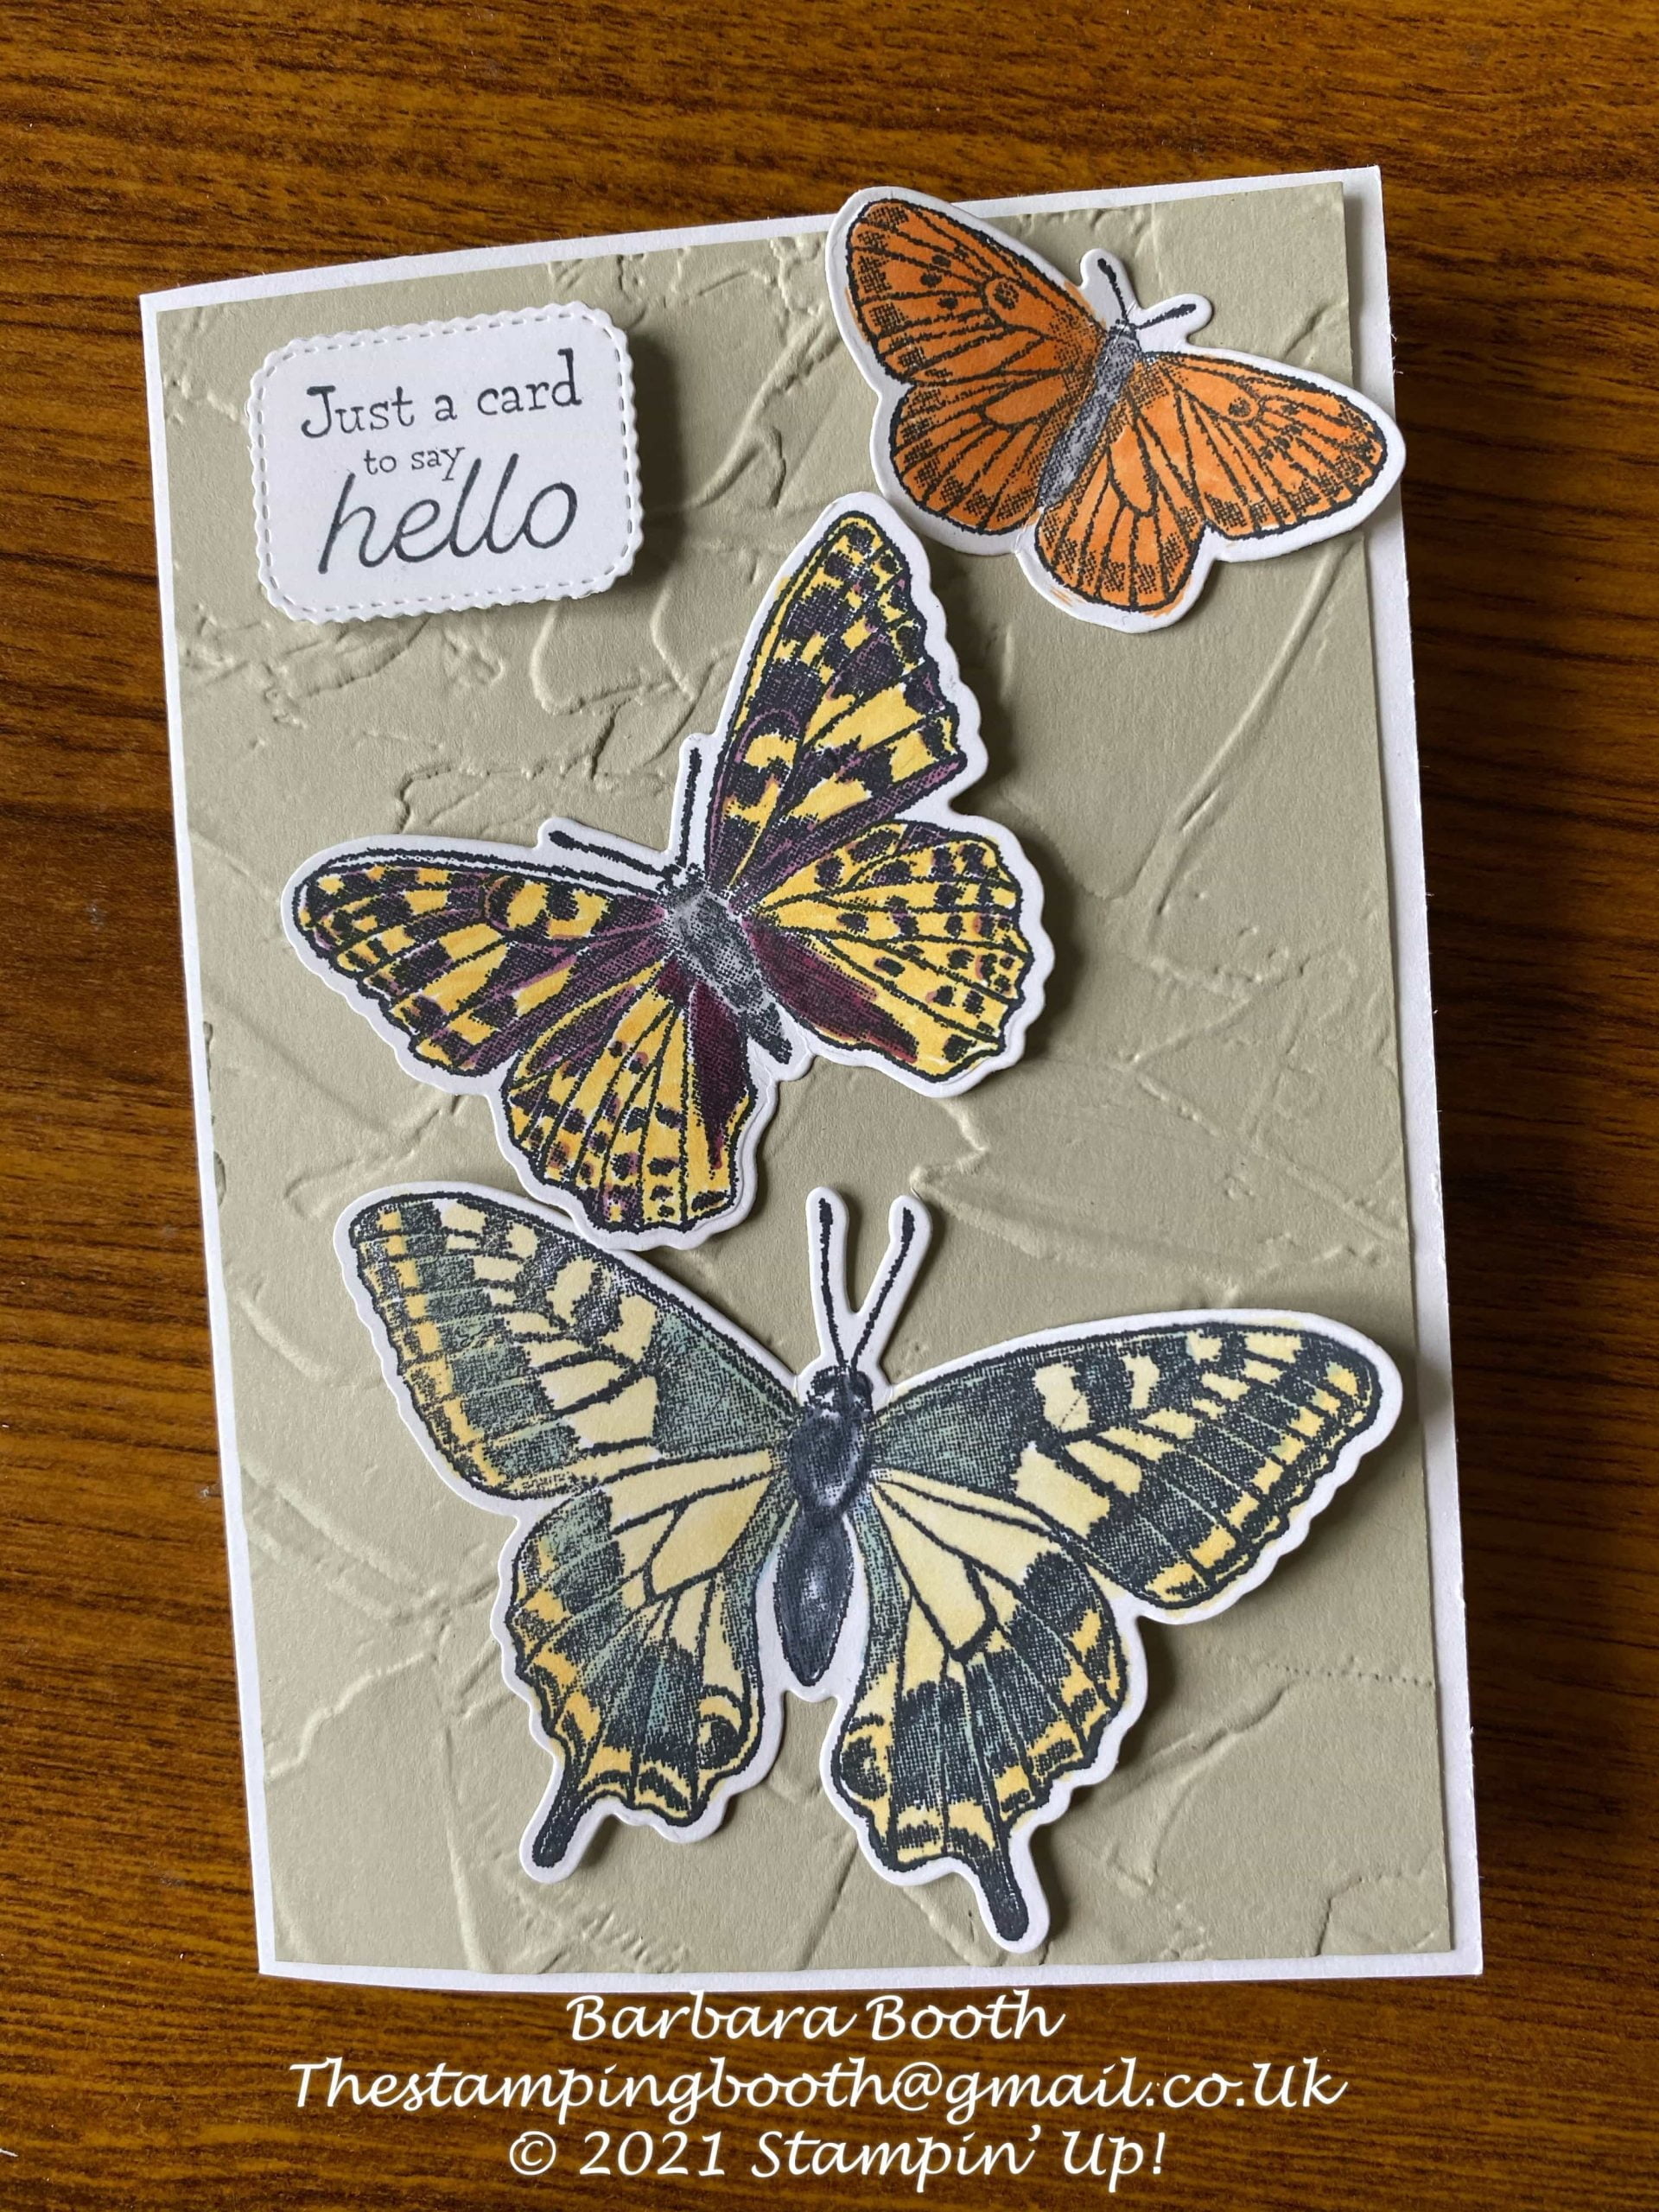
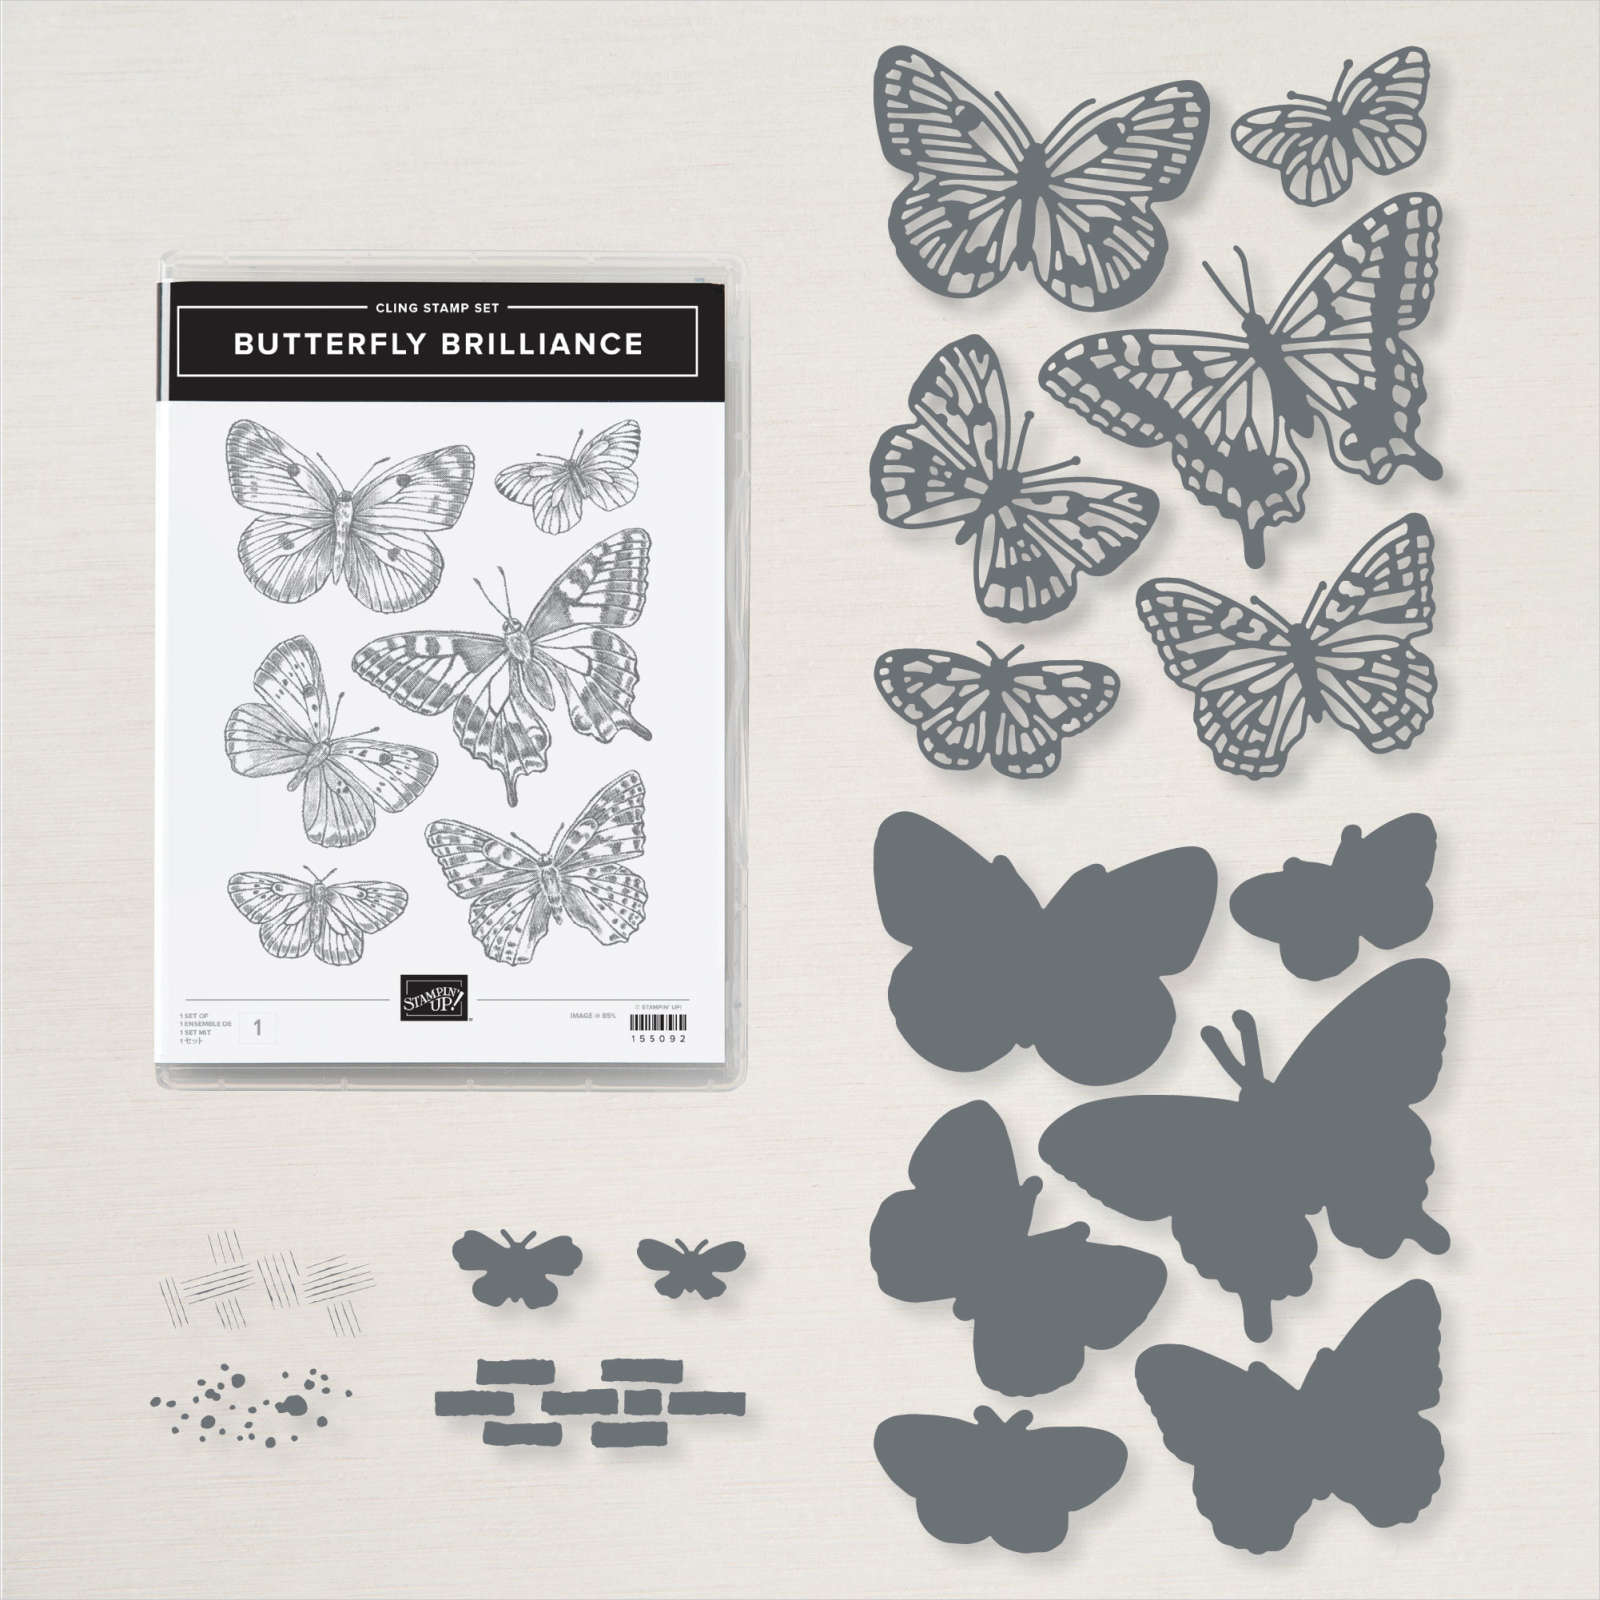
I’ve had Butterfly Brilliance Stamp set and the co-ordinating Brilliant wings dies for a while now, but not shown them to you until today!
I love how British these stamps are….so like our butterflies. They have so much details and the dies are stunning!
Yes, they are one large stamp, but by clever positioning of your paper, there is no need to stamp or die cut all of the butterflies in one go.
I made 1 card before hand using the Painted Texture 3D embossing folder on Sahara Sand card stock, to give it a lovely faux wall background. I coloured the butterflies with blends…Pumpkin Pie, Mango Melody, Blackberyy Bliss and So Saffron.
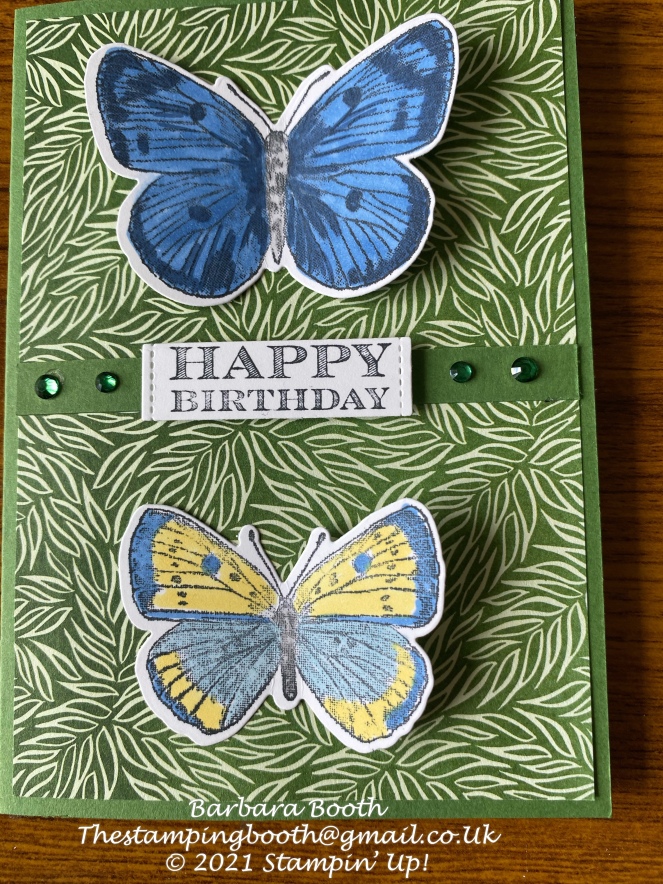
The cards I made Live, used soon to be retiring DSP (Designer Series Papers).
The first card used Forever Greenery, layered onto a Garden Green card base. The butterflies were coloured with Night of Navy, Daffodil Delight and Balmy blue blends for the outside, and a smaller butterfly was added to the inside which was coloured in Pumpkin Pie.
After the Live session had finished, I added a few Holiday Rhinestone jewels
The second card used Artisan Blooms DSP, on a layer of Pumpkin Pie. This time the butterfly was die cut from a piece of Pumpkin Pie cardstock and again some Holiday Rhinestones to embellish.
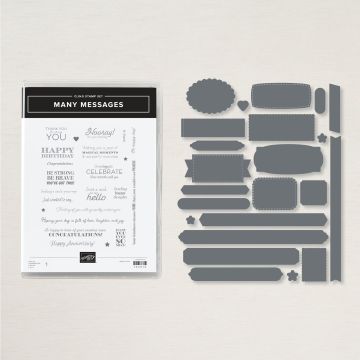
Sentiments for these cards were all taken from the Many Messages stamp set and the coordinating Messages Dies.
The Butterflies are from the upcoming Annual Catalogue, but are available now. The Many Messages is from the January to June Mini Catalogue.
Don’t forget the brand new Annual Catalogue will be available later this month. If you are not a regular customer, but would like a catalogue, please use the ‘contact me’ tab above, and I will get one to you.
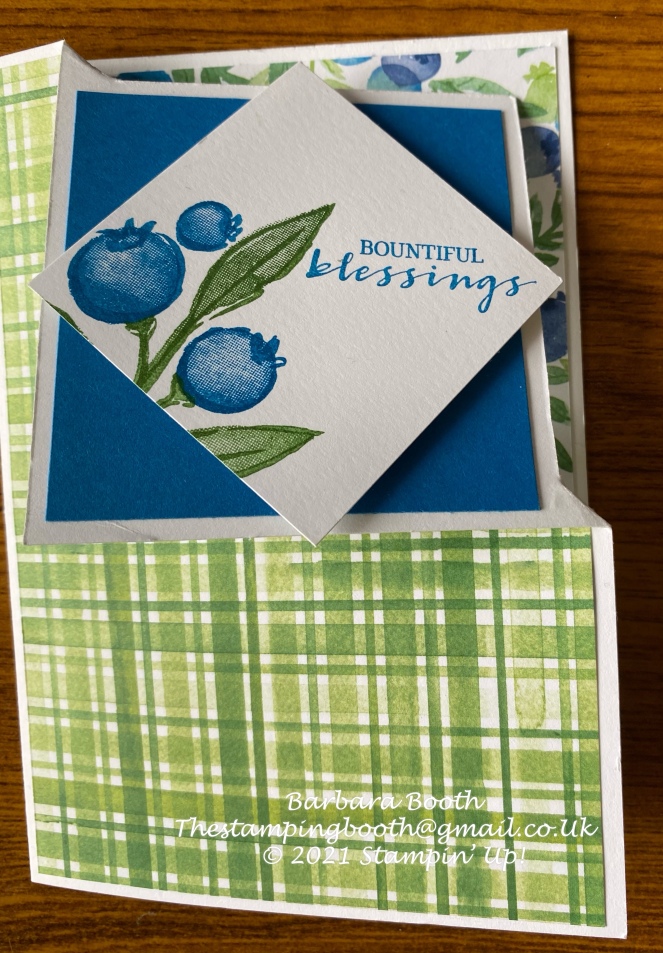
During yesterdays Craft and Chat session, I demonstrated a Corner Flip fancy fold card. I got the inspiration for this card from a video by Rachel Tessman.
This card uses the discontinued Berry Blessings stampset and Berry Delightful DSP
For those who were not with us, and those who didn’t get their card finished, here are the instructions;
You will need:-
Standard A5 card base
Dsp 10×14.4cm x2 (one for outside, one for inside)
Paper trimmer
Stampset and sentiment to decorate
Additional card for layer if desired
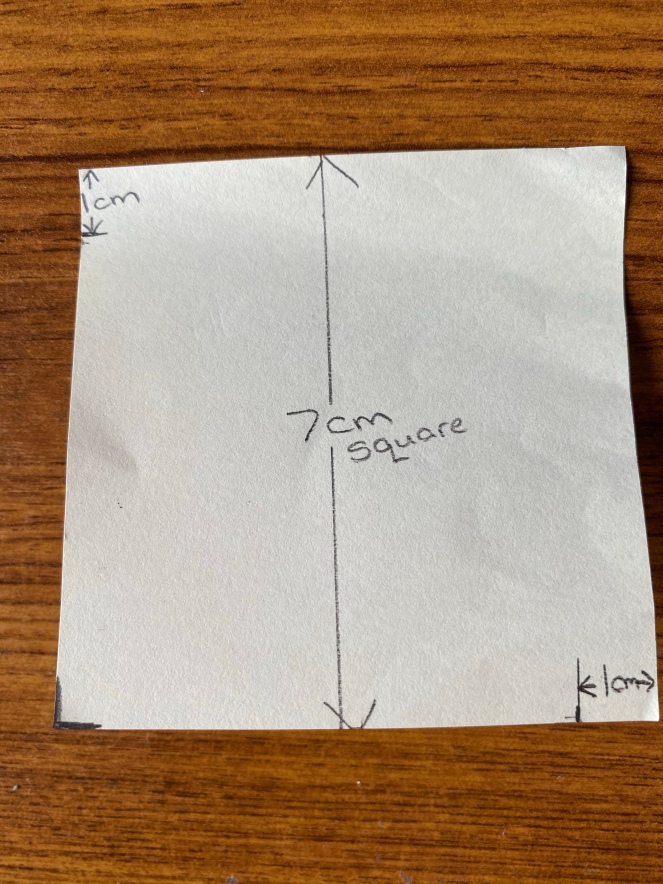
Scrap of paper 7.5×7.5cm or post it note 3″ square will do the same job
Pencil, ruler, eraser
Cover the front of your card base with DSP, taking care to not leave any parts unstuck, as when you cut through you don’t want any loose edges.
Take the scrap paper/post it note and measure 1cm from the top left corner down the left side and make a mark.
Do the same from the bottom right corner along the bottom
This should be a 7.5cm square!!
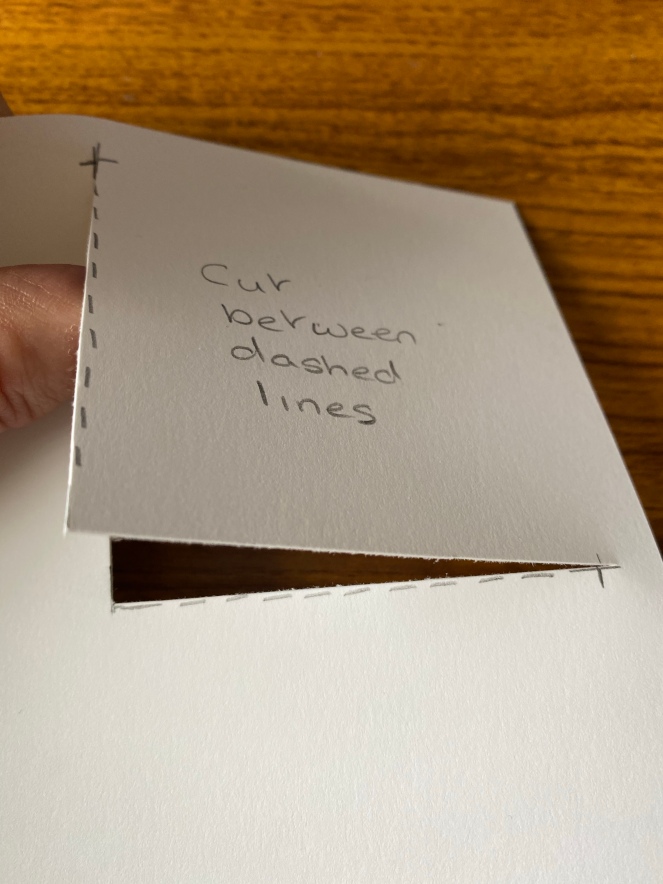
Lay this paper onto the top right of your card, lining up the top and right sides
Transfer the lines onto your card, but include around the bottom left corner too
These lines will be on your DSP not on the blank card as shown
Carefully line up the lines on the cutting guide of your paper trimmer and cut along between the marks
Take care not to cut right to the edges!
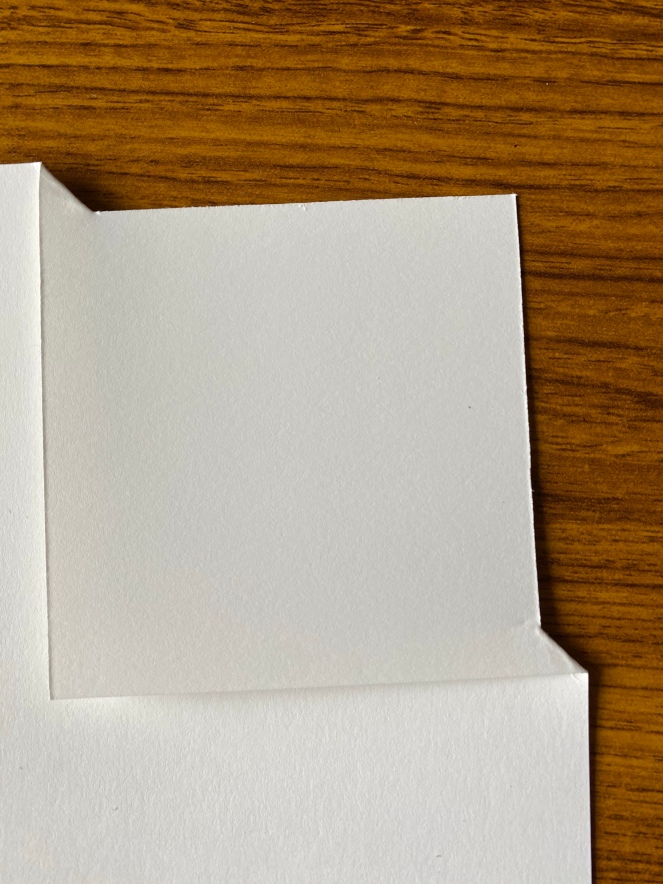
Very gently bend the top right corner of the card forward, pivoting on the 1cm edge pieces, until it reaches the front of the card and is square to the rest of the card. Once happy crease these edges so that it lays flat
Gently manipulate the fold
The top of your card should look like this!
And when stamped and layered and an insert added to the inside, should look like this !
If you didn’t already know….Stampin’Up!s spring summer mini catalogue will be launched on Tuesday January 5th 2021! And not just that catalogue… the fabulous Sale-a-bration catalogue too!
The Mini catalogue runs from Jan 5th until June 30th 2021 and complements the annual catalogue which is available until May 3rd 2021. (If you dont have a catalogue (either annual or mini) and would like one, then please use the contact me tab above and I will get one out to you (UK only).
On todays Facebook live I demo’d a couple of new products…The garden Wishes Stamp Set, The Darling Donkeys Stampset (Free with £45 spend from Jan 5th) and the gorgeous new Blending brushes!
If you’d like to see how I made these and how to use the blending brushes, checkout my Facebook page https://www.facebook.com/thestampingbooth
In Good Taste is the DSP (designer series paper) that I am using this week in the blog hop. This is another of the paper packs that are on offer until the end of October. Drop me a note if you’d like to order.
My three cards are all the same this week, but show how different they can look in different colour ways.
The first card uses Night of Navy for its main colour, and the stamp set used is Tasteful Textures. The die cut leaves are from varies die sets and are cut in the lovely new Brushed Metallic papers
The second has a Petal Pink base, Petal Pink flower and Gray Granite stamping. This time the dies cuts are in Silver foil paper
Finally, the third card base is Early Espresso, with Old Olive die cut pieces and a Daffodil Delight flower coloured with Stampin Blends.
Hope you pop over to the other blogs to see all the other fab ideas with DSP and it inspires you to get your papers out and use them!
I don’t think anyone would describe me as a cat or dog person. Although we have had both as pets over the many years we have been married.
Playful Pets DSP;
Product List
I got this Designer series paper (DSP) left over from a paper share, so though this a great opportunity to see what I can do with it.
I have made 3 projects this week, all with very little stamping, so making the DSP work do all the work for me.
The first card was cat themed and I used one cat from the DSP as my focal point and then adhered it to some fancy labels from the Tasteful labels die set
And then I played with the dogs…..
A LOT of fussy cutting here, but a cute card for the dog lovers out there!!
And finally I made a really useful, decent sized box! It is 4” square and I thought the colour scheme leant itself to being festive, so I added a Christmas tag to the front
Product List
Hope you’ve enjoyed looking at my ‘makes’ once again, don’t forget to click the link below and have a look at the other peoples ideas on this bloghop
Did you check out the other blogs last week? Well, we are doing this for the whole of October so check in every week for more. Its fab to see other peoples ideas, even with the same papers it can look so different. We hope it gives you some inspiration to use or buy papers….I know for sure I’m a bit of a hoarder!
This week I’ve used Pattern Play DSP for the two card I’ve made specifically for this blog hop. They use a fabulous range of bright and cheerful colours, great for both Male and Female cards.
Product List
The first card I made uses Night of Navy for all the mat layers, Stitched Triangle Dies, Night of Navy (from the co ordinating ribbon set) and Daffodil Delight Ribbon and the sentiment is from Happiest of Birthdays stamp set. Not sure the stitching shows up too well in the triangles on her, but I think it adds some lovely interest.
The second card uses Calypso Coral as the mat layer and all the paper is the oddments from previous cards made. The sentiment is also from Happiest of Birthdays stamp set and stamped in Coastal Cabana ink.
Did you know that selected DSP is on offer this month?
To help promote, I am joining in a blog hop. Don’t know what a blog hop is? Well just follow the links at the bottom of this page, which will ‘hop’ you to other peoples blog, where you can look at other peoples ideas…easy!
We are doing this every Tuesday, so have a peep each week for ideas using these offer papers.
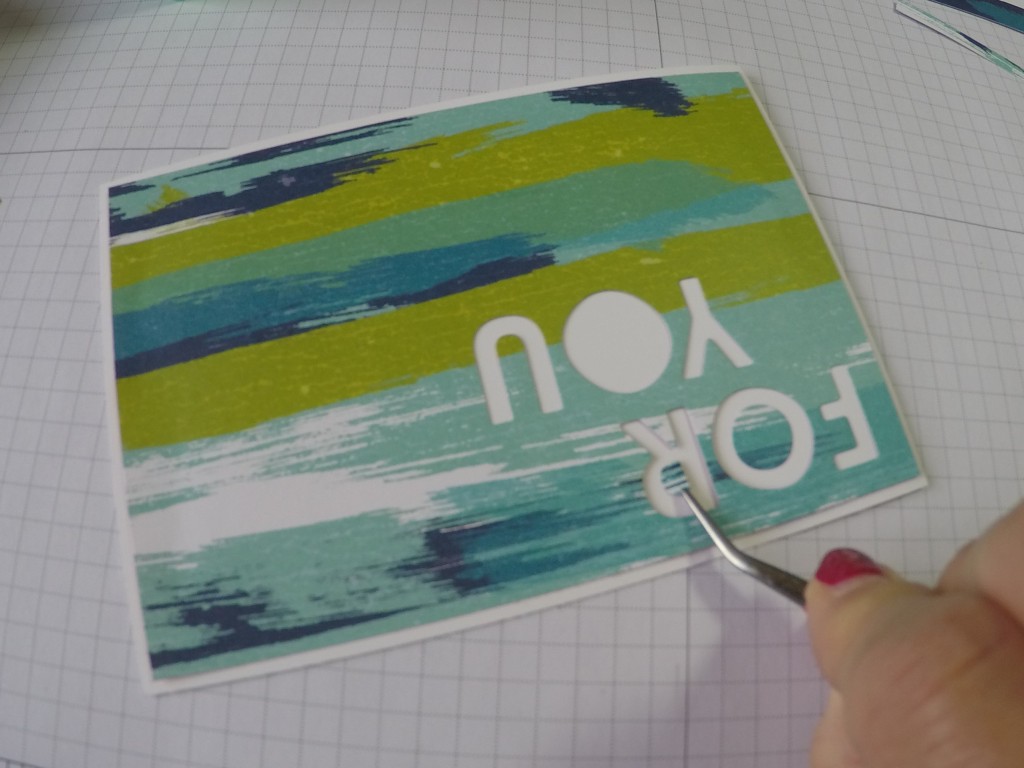
This week I’m using the Artistry Blooms papers to make 2 cards.
Card number 1
First cut your DSP to 14.4cmx 10cm
Then I used the Playful Alphabet dies to cut the words ‘For You’ in the top left corner
Dont forget to glue the centres of the ‘O’s and ‘R’!
And that was my first card…so simple and can be used for lots of different things!
But hey…I’d got the die cut words still, so…….
Card number 2
As before , I cut a piece of DSP 10 x 14.4 cm
I cut 3 strips of DSP that matched the die cut letters that were about 10cm x 1cm and cut diagonally across all the ends (one in the opposite direction to the others).
I die cut and embossed a label from the ‘Tasteful Labels@ die set and stamped ‘Happy Birthday’ from the ‘Many Mates’ stamp set in Night of Navy ink. Have a look in the picture below…it shows the embossing off much better!
I glued the letters, and paper strips to the DSP and used dimensionals to raise the sentiment off the card. I then assembled the card and ‘voila’.
Todays Facebook Live, using the gorgeous Flowers for Every Season designer series papers and IN Colors, NEW for the 2020/2021 catalogue. Such lovely vibrant colours!
Not got your catalogue yet? Drop me a message to get one sent out to you (UK only)
Join me every Monday at 11am for 2 simple cards and Thursdays at 2pm for Fancy Folds or Techniques…Search The Stamping Booth on Facebook.
Since Covid 19 and lockdown, i have been doing Facebook Lives every Monday and Thursday.
I’ve decided I perhaps ought to show you what I’ve been doing. Each day is still available to view, so if you want to go back over any, then you can, or better still join me ‘Live’ on Monday at 11am (BST) and Thursdays at 2pm (BST).
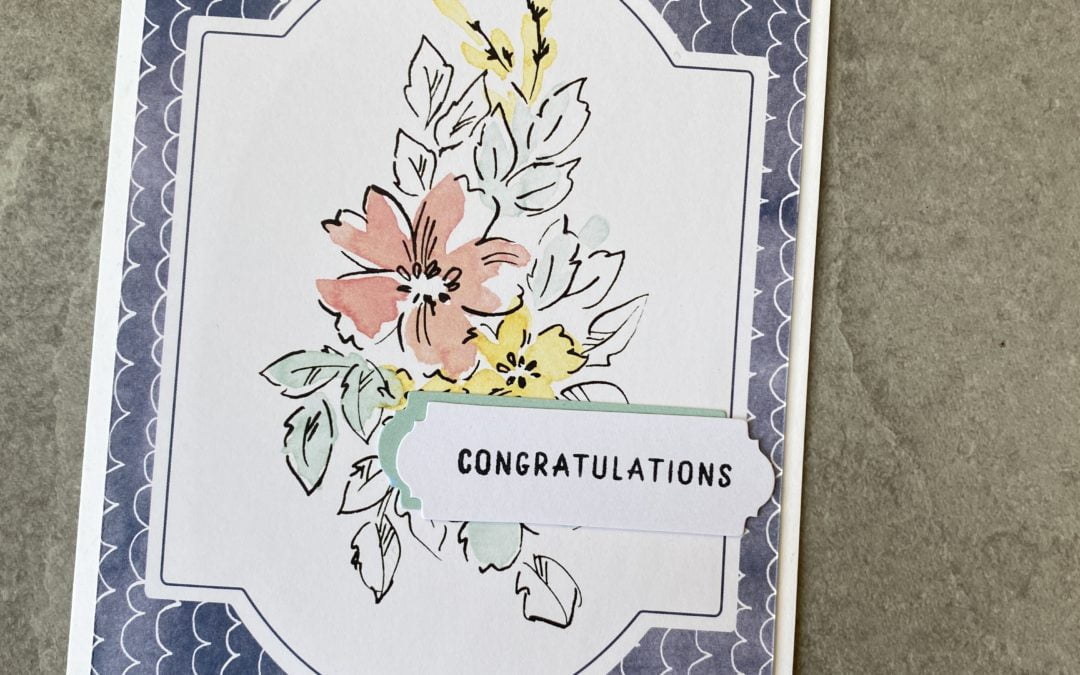
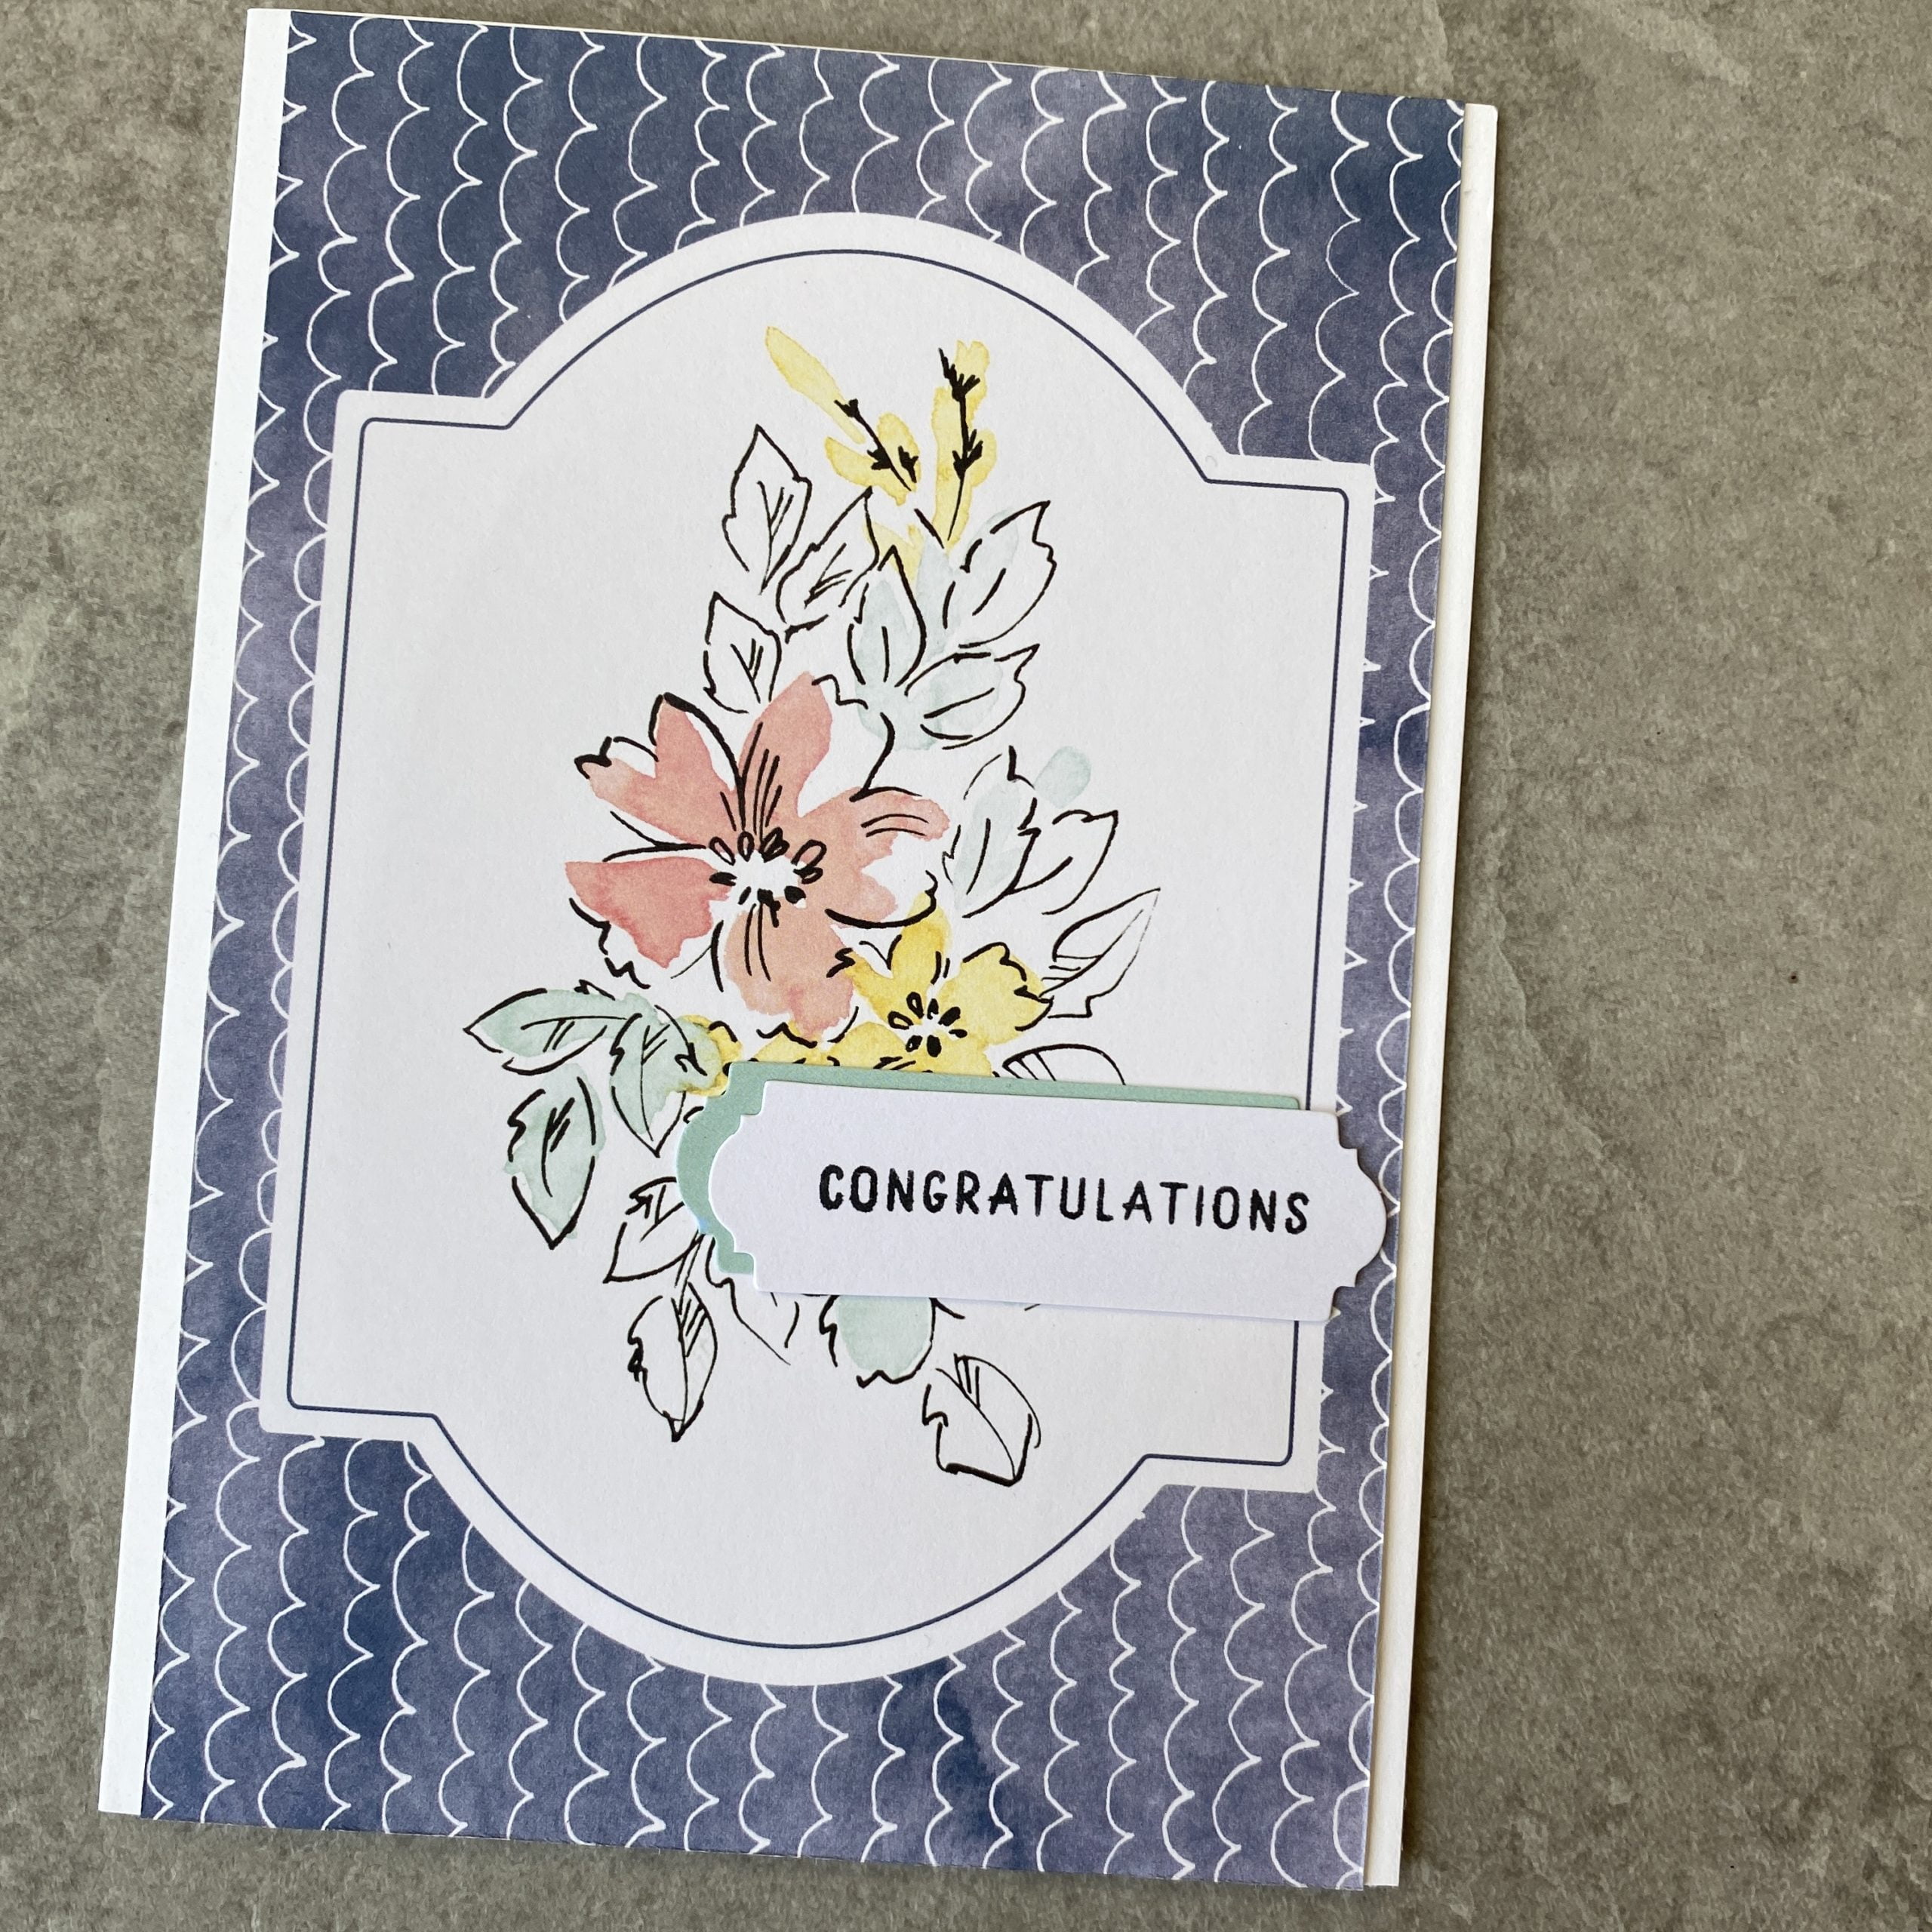
Scrappy Strips technique
cased from Bruno Bertucci
using Perennial Essence DSP and Floral Essence Stampset for sentiment for ‘Congratulations’ card
Perennial Essence DSP and sentiment from Peaceful Moments Stamp set for ‘All days are…..’
Subtles cardstock collection and Happy Birthday to You (SAB SET) for ‘Happy Birthday card
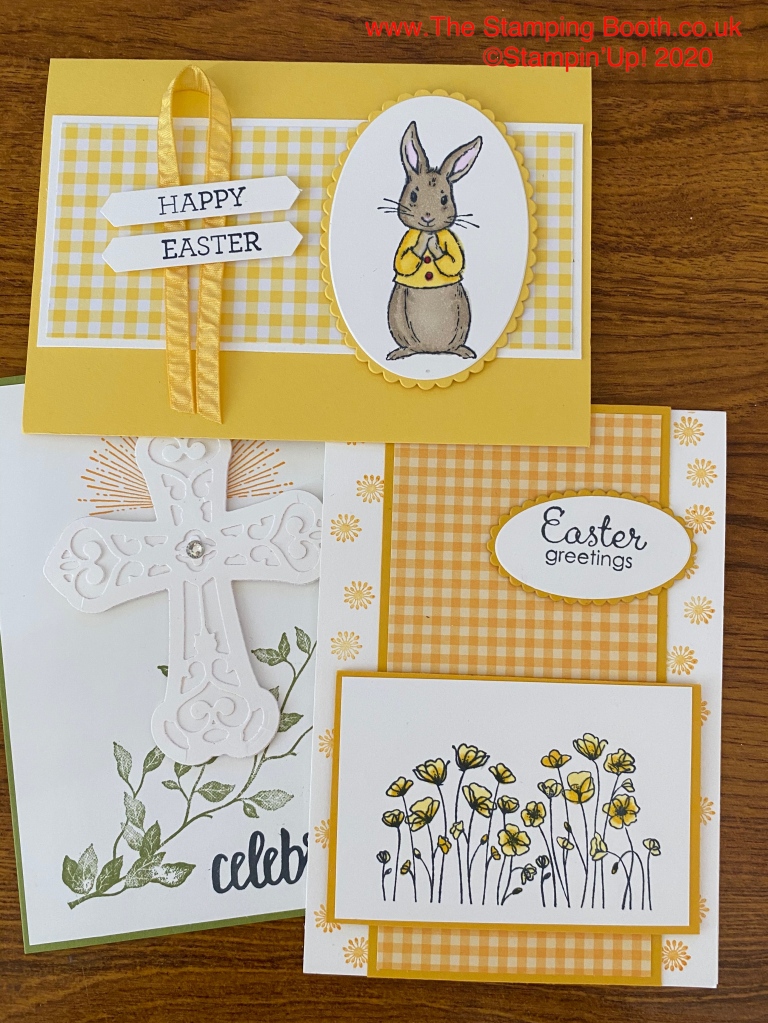
Easter Cards
Fabled Friends, Painted Poppies and Very Versaille Stamp sets used for these three
Tricorn Card
Idea from 2biggirlscrafting.co.uk from a sample given at a Stampin’ Up! convention
My cards used Bonanza Buddies and Family Party
and Best Catch stamp sets
Come Fly with Me!
A spot of masking with Free as a Bird stampset for the first card, and then co ordinating papersfor the second
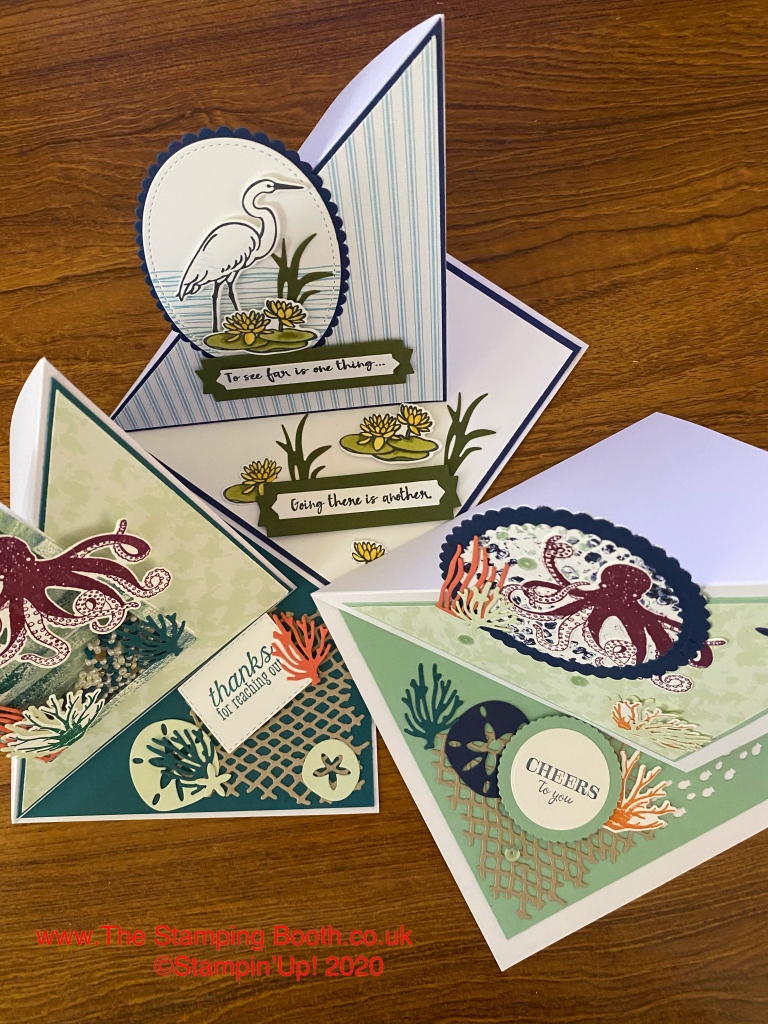
Twisted Easel
Lilypad lake stamps and dies were used for the Egret card
Sea of Textures stamp set and co ordinating (retired) papers were used for the Octopus cards
A lot of Hot Air
Above the Clouds stamp set was used for all of these cards.
Bottom left card used ‘It Starts with Art’ Designer series papers for the balloons. And all used blends for colouring
Impossible Card
Can’t give this card credit to anyone in particular as there are hundreds of versions online, but here’s mine.
Ornate Thanks stamp set and co ordinating dies and papers were used for the floral card, and Geared up Garage stamps, dies and (retired) papers were used for the ‘car’ design
Want to find out more….pop over to The Stamping Booth Facebook page to see how these were made.
We use cookies on our website to give you the most relevant experience by remembering your preferences and repeat visits. By clicking “Accept All”, you consent to the use of ALL the cookies. However, you may visit "Cookie Settings" to provide a controlled consent.
This website uses cookies to improve your experience while you navigate through the website. Out of these, the cookies that are categorized as necessary are stored on your browser as they are essential for the working of basic functionalities of the website. We also use third-party cookies that help us analyze and understand how you use this website. These cookies will be stored in your browser only with your consent. You also have the option to opt-out of these cookies. But opting out of some of these cookies may affect your browsing experience.
Necessary cookies are absolutely essential for the website to function properly. These cookies ensure basic functionalities and security features of the website, anonymously.
Cookie
Duration
Description
cookielawinfo-checkbox-analytics
11 months
This cookie is set by GDPR Cookie Consent plugin. The cookie is used to store the user consent for the cookies in the category "Analytics".
cookielawinfo-checkbox-functional
11 months
The cookie is set by GDPR cookie consent to record the user consent for the cookies in the category "Functional".
cookielawinfo-checkbox-necessary
11 months
This cookie is set by GDPR Cookie Consent plugin. The cookies is used to store the user consent for the cookies in the category "Necessary".
cookielawinfo-checkbox-others
11 months
This cookie is set by GDPR Cookie Consent plugin. The cookie is used to store the user consent for the cookies in the category "Other.
cookielawinfo-checkbox-performance
11 months
This cookie is set by GDPR Cookie Consent plugin. The cookie is used to store the user consent for the cookies in the category "Performance".
viewed_cookie_policy
11 months
The cookie is set by the GDPR Cookie Consent plugin and is used to store whether or not user has consented to the use of cookies. It does not store any personal data.
Functional cookies help to perform certain functionalities like sharing the content of the website on social media platforms, collect feedbacks, and other third-party features.
Performance cookies are used to understand and analyze the key performance indexes of the website which helps in delivering a better user experience for the visitors.
Analytical cookies are used to understand how visitors interact with the website. These cookies help provide information on metrics the number of visitors, bounce rate, traffic source, etc.
Advertisement cookies are used to provide visitors with relevant ads and marketing campaigns. These cookies track visitors across websites and collect information to provide customized ads.


")
 Metallic Woven Ribbon")


")
 2020–2022 In Color Ribbon")
 Designer Series Paper")


")


 Cardstock")


 Mixed Satin Ribbon")


 Designer Series Paper")


 Ruched Ribbon")
")


")