During the past week, I have run a workshop demonstrating four fancy fold Christmas cards. In fact, the workshop extended into another session, as I didn’t take into account how much work we actually had to do! (Note to self, 2 fancy folds is enough in one session!)
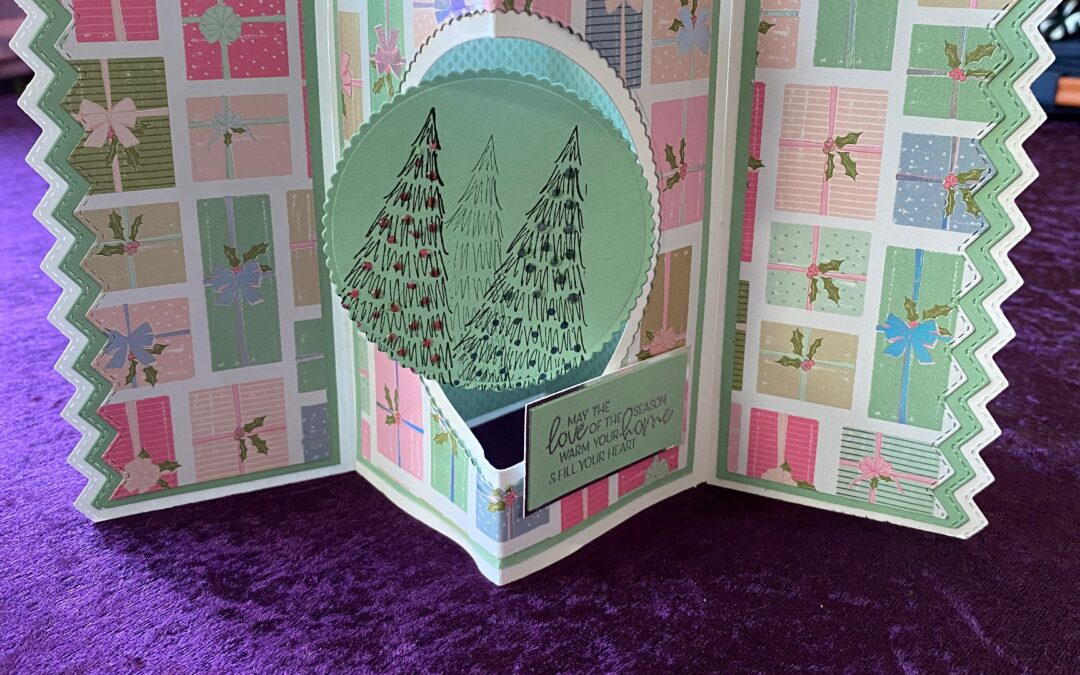
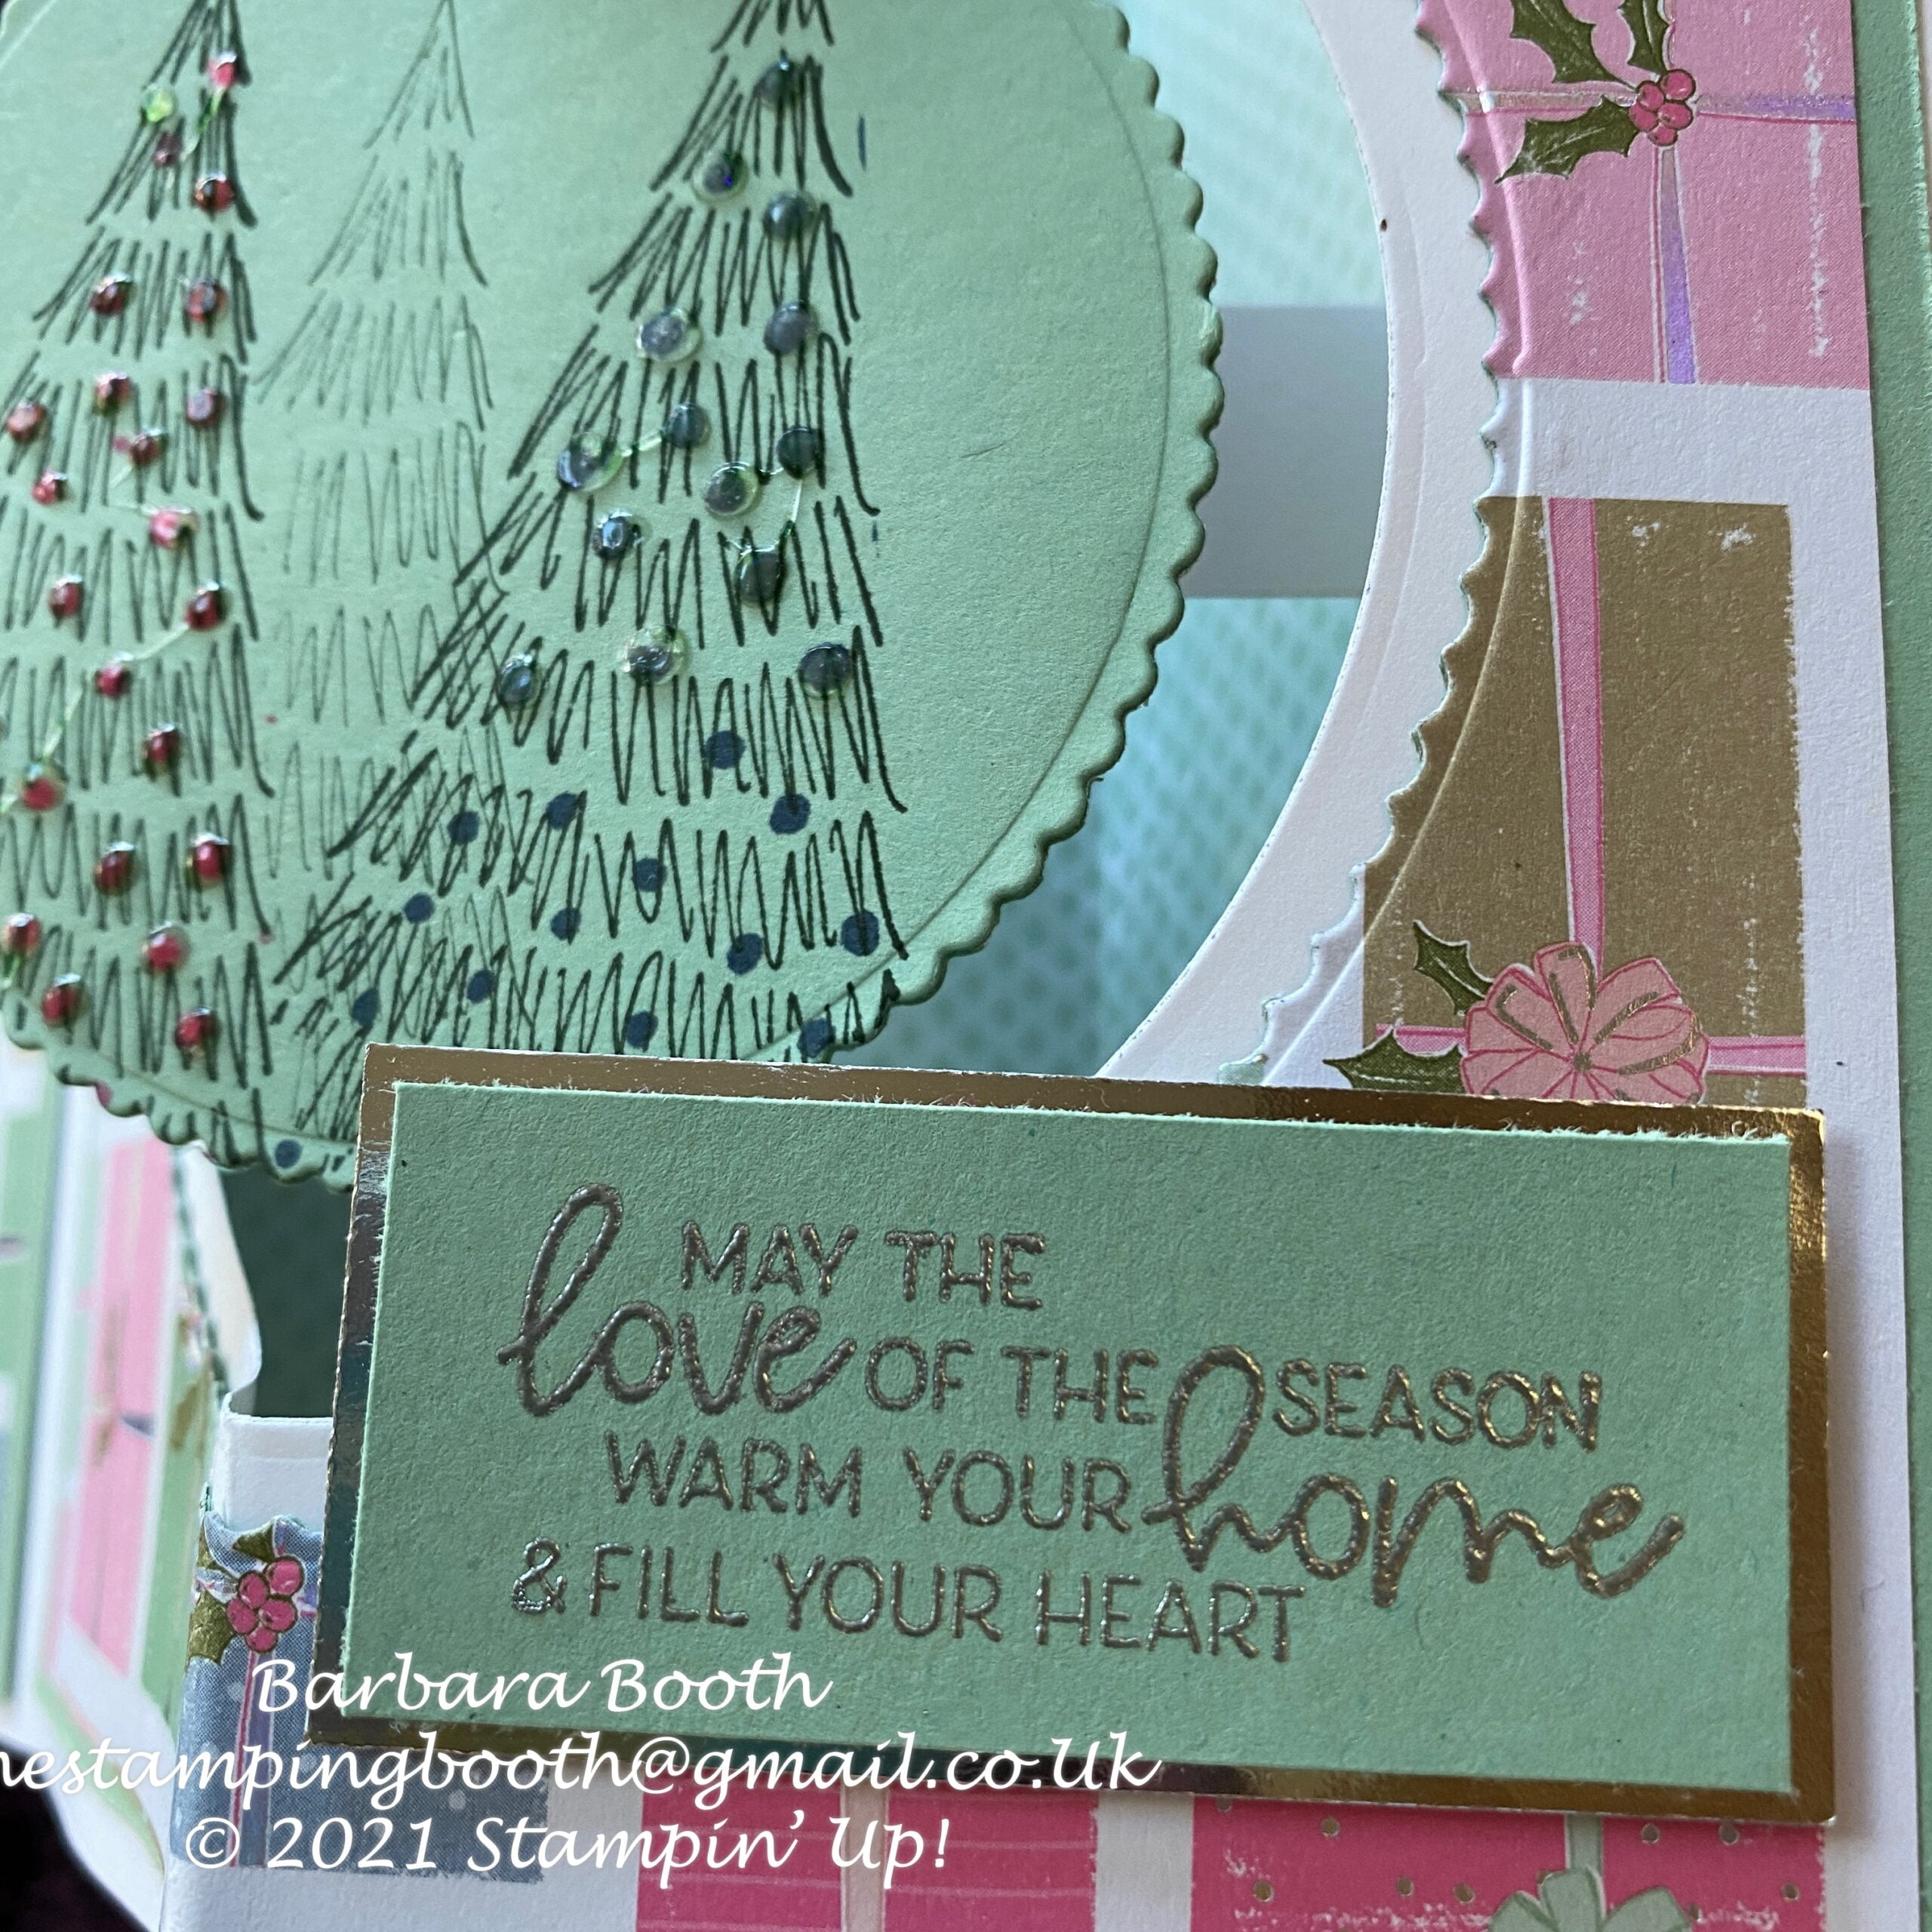
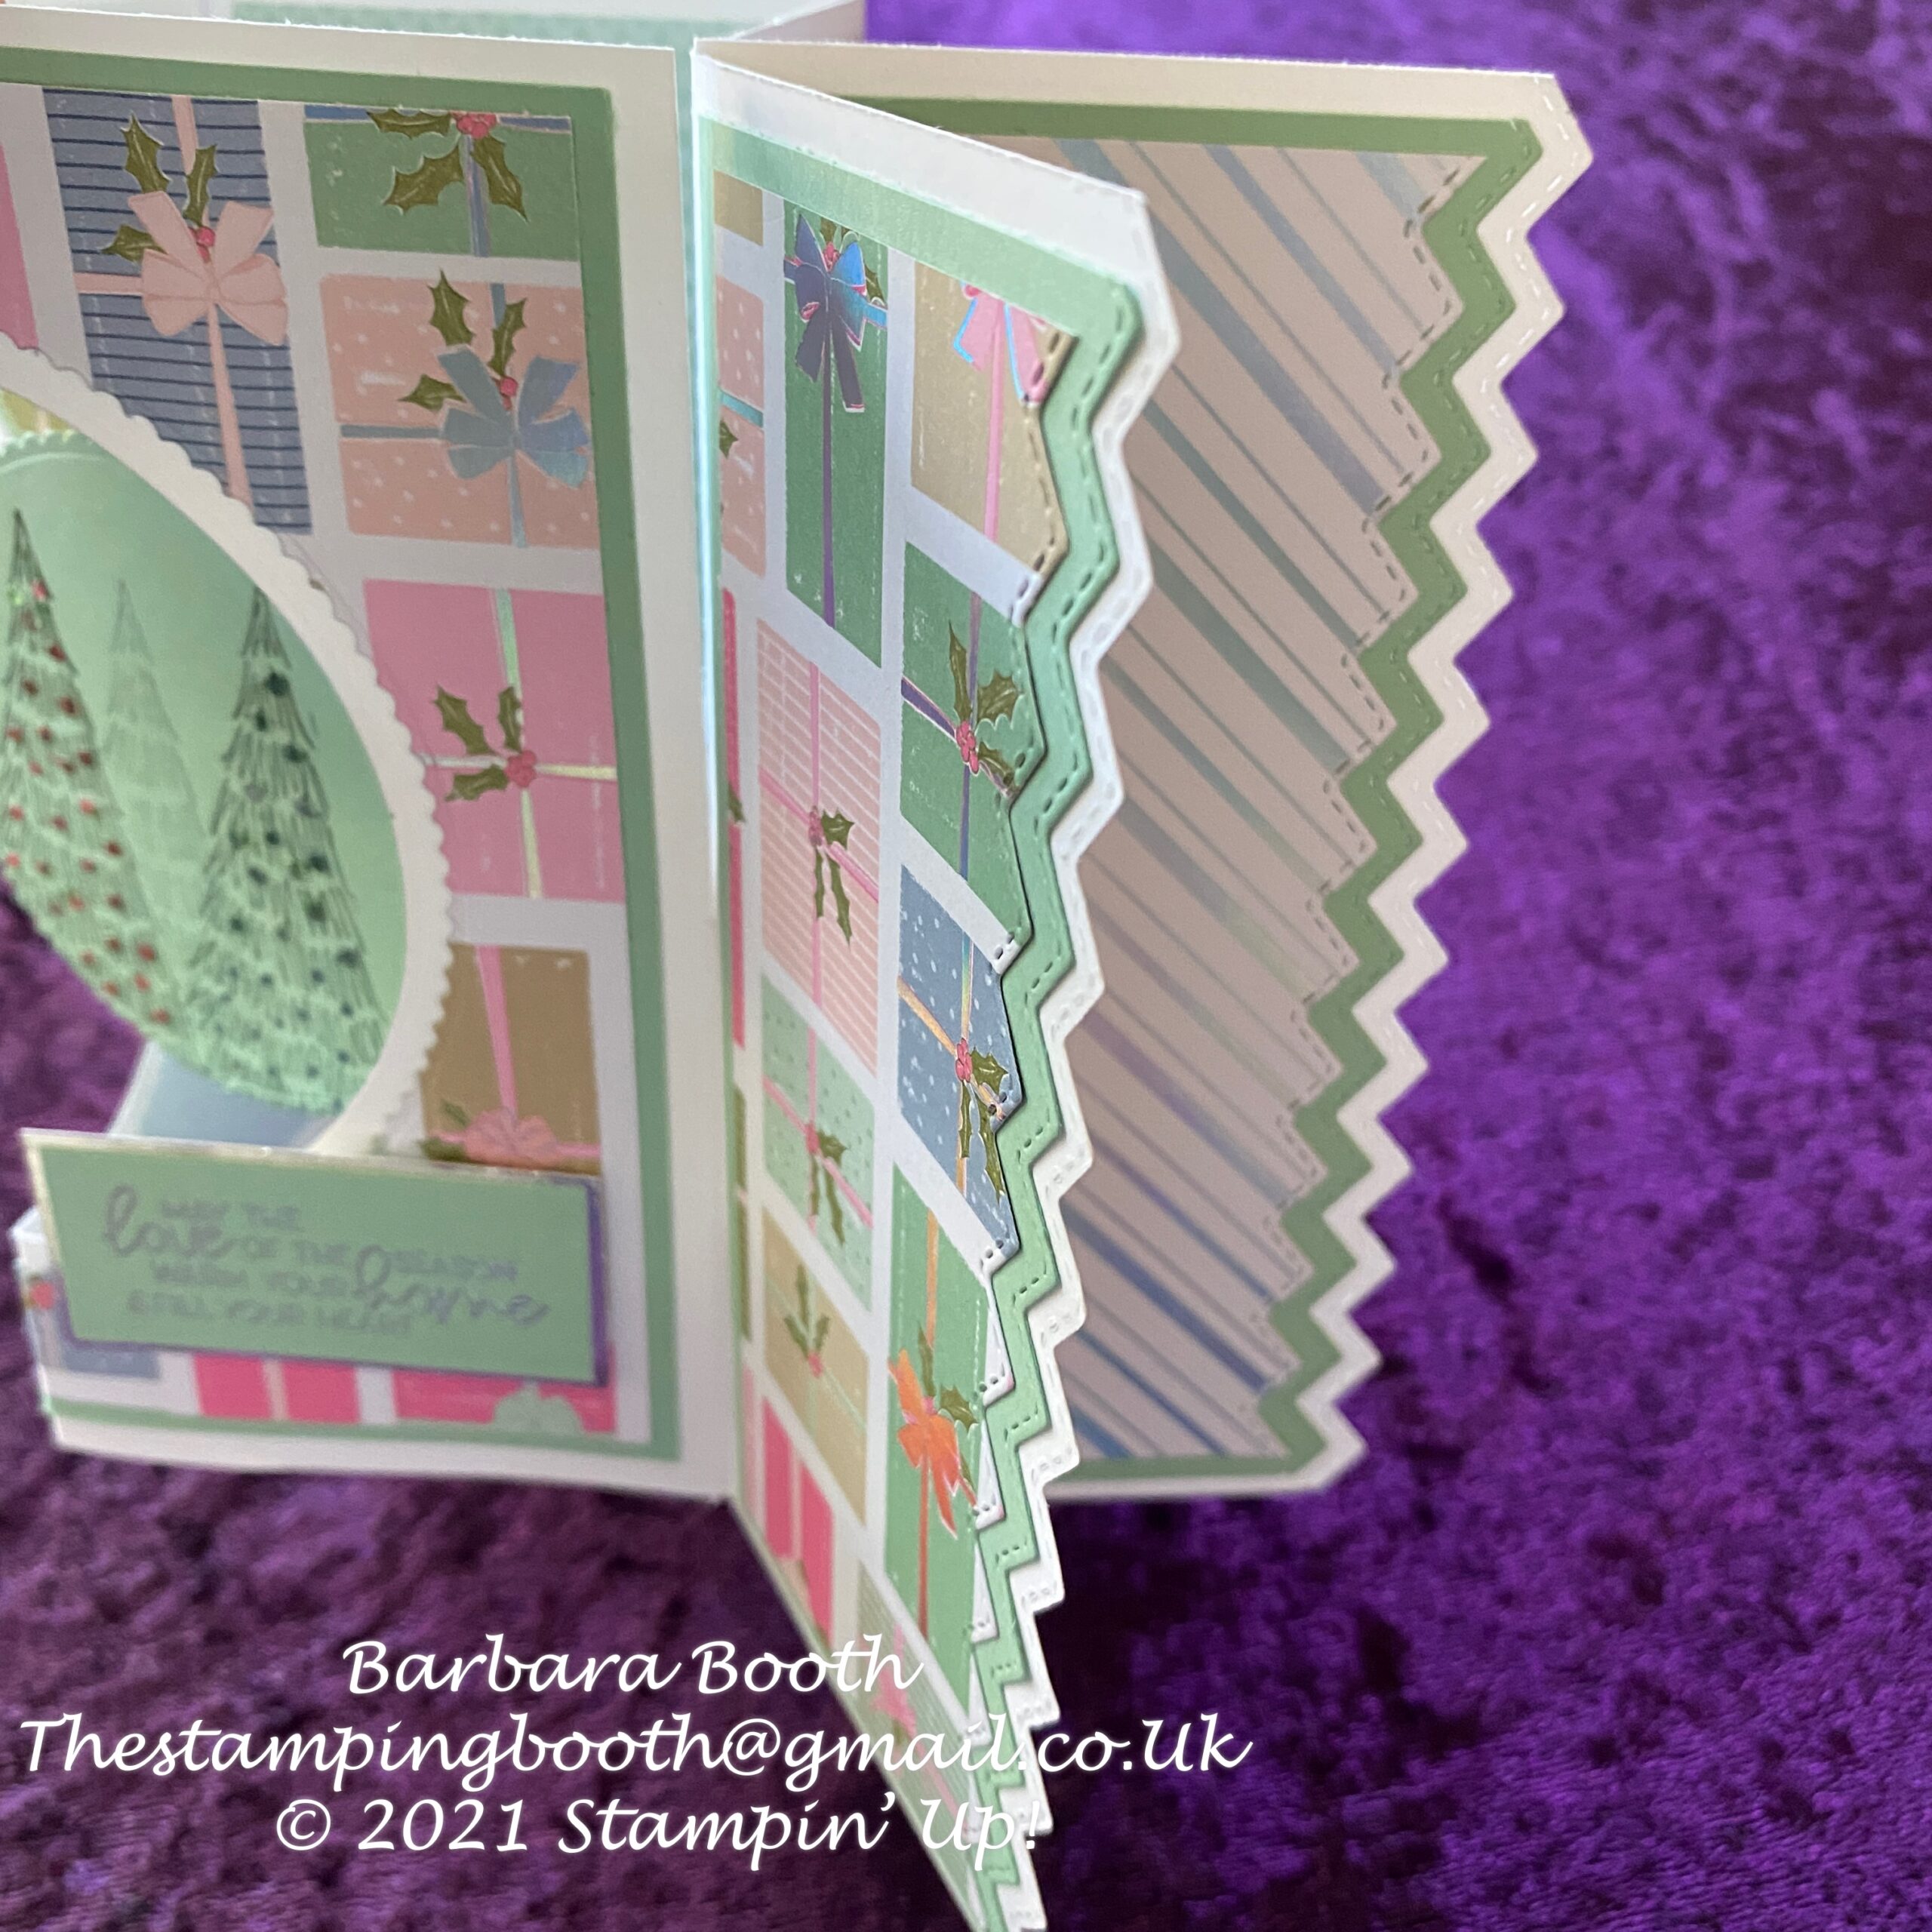
This card is one of the ones we made. Probably the most technical and certainly a challenge to follow my own hand written instructions!
Lots of the materials were from the Whimsy and Wonder suite. I used 12 x 12 basic card stock for the base, but because it is not very stiff, I used lots of layers to help support it.
I wanted a cracker like feel to the card. The Basic edge dies were perfect to achieve this effect, and this is what took a lot of time….12 edges to die cut for each card!
I didn’t use Stampin’ Up! dies for the central aperture, as they were not big enough for it.
The gorgeous Whimsy and Wonder specialty designer series papers were used to decorate this fancy fold card. They are foiled on one side and so pretty. In fact they are so beautiful that its hard to decide which side to use, and in fact, some of the workshop attendees used the opposite side to what I used in my sample card. I stamped some of the Whimsical trees and the coloured baubles on to the central panel. To finish I added some Crystal Shimmery effects to make those pretty baubles shimmer.
To order any of the products used to make this fancy fold card, click on the images below.
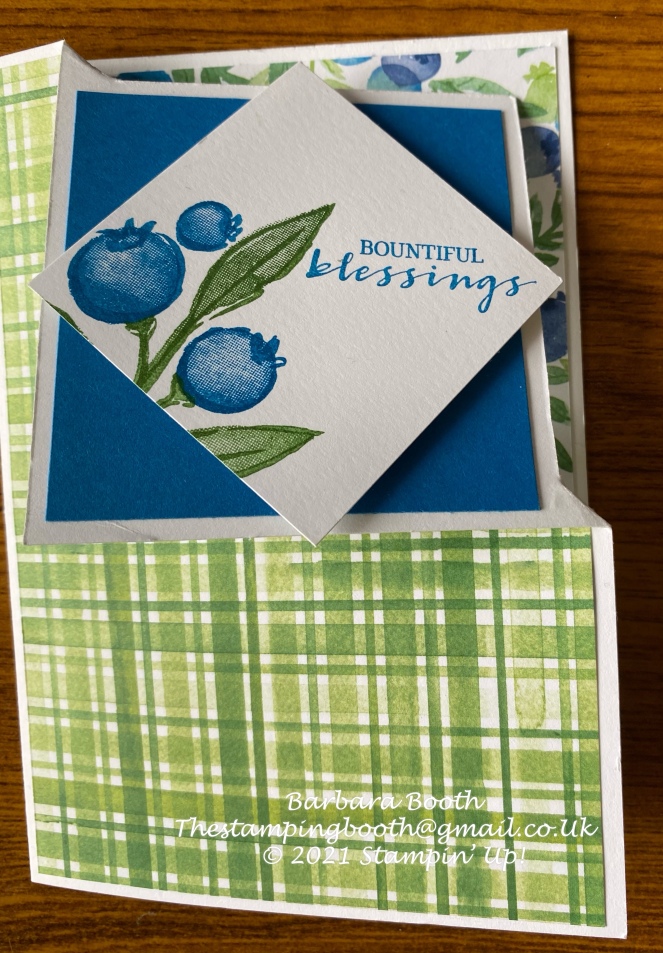
During yesterdays Craft and Chat session, I demonstrated a Corner Flip fancy fold card. I got the inspiration for this card from a video by Rachel Tessman.
This card uses the discontinued Berry Blessings stampset and Berry Delightful DSP
For those who were not with us, and those who didn’t get their card finished, here are the instructions;
You will need:-
Standard A5 card base
Dsp 10×14.4cm x2 (one for outside, one for inside)
Paper trimmer
Stampset and sentiment to decorate
Additional card for layer if desired
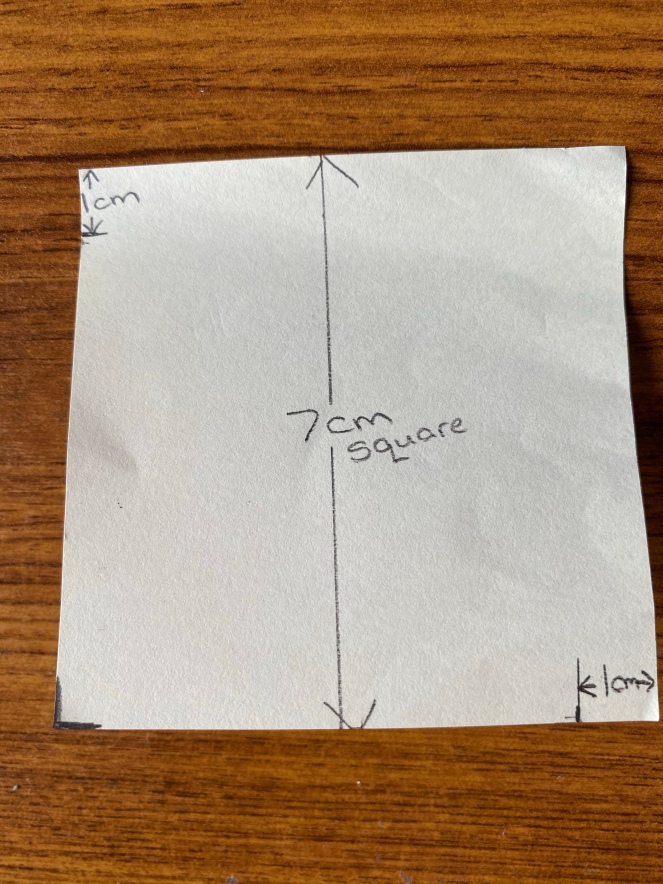
Scrap of paper 7.5×7.5cm or post it note 3″ square will do the same job
Pencil, ruler, eraser
Cover the front of your card base with DSP, taking care to not leave any parts unstuck, as when you cut through you don’t want any loose edges.
Take the scrap paper/post it note and measure 1cm from the top left corner down the left side and make a mark.
Do the same from the bottom right corner along the bottom
This should be a 7.5cm square!!
Lay this paper onto the top right of your card, lining up the top and right sides
Transfer the lines onto your card, but include around the bottom left corner too
These lines will be on your DSP not on the blank card as shown
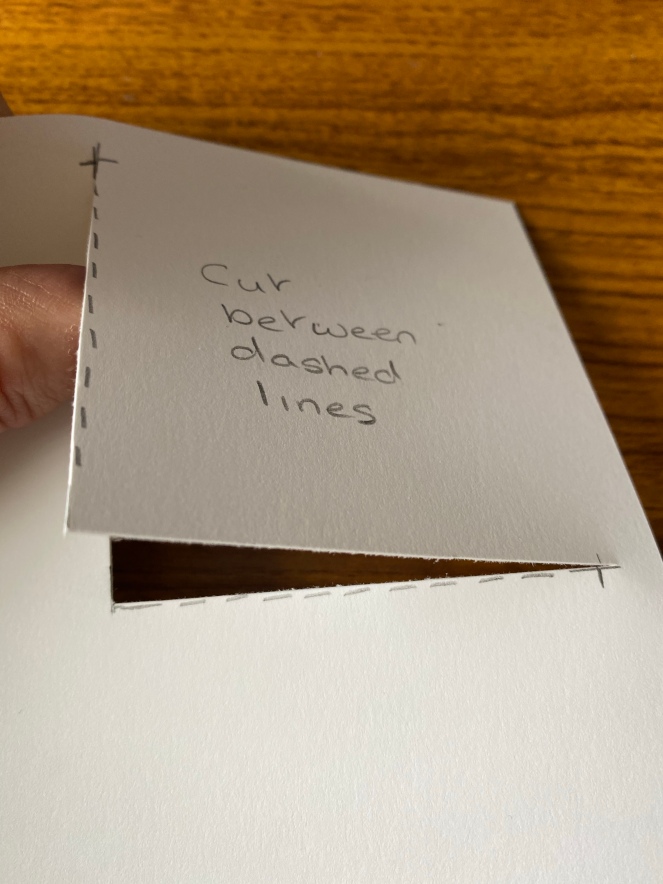
Carefully line up the lines on the cutting guide of your paper trimmer and cut along between the marks
Take care not to cut right to the edges!
Very gently bend the top right corner of the card forward, pivoting on the 1cm edge pieces, until it reaches the front of the card and is square to the rest of the card. Once happy crease these edges so that it lays flat
Gently manipulate the fold
The top of your card should look like this!
And when stamped and layered and an insert added to the inside, should look like this !
Since Covid 19 and lockdown, i have been doing Facebook Lives every Monday and Thursday.
I’ve decided I perhaps ought to show you what I’ve been doing. Each day is still available to view, so if you want to go back over any, then you can, or better still join me ‘Live’ on Monday at 11am (BST) and Thursdays at 2pm (BST).
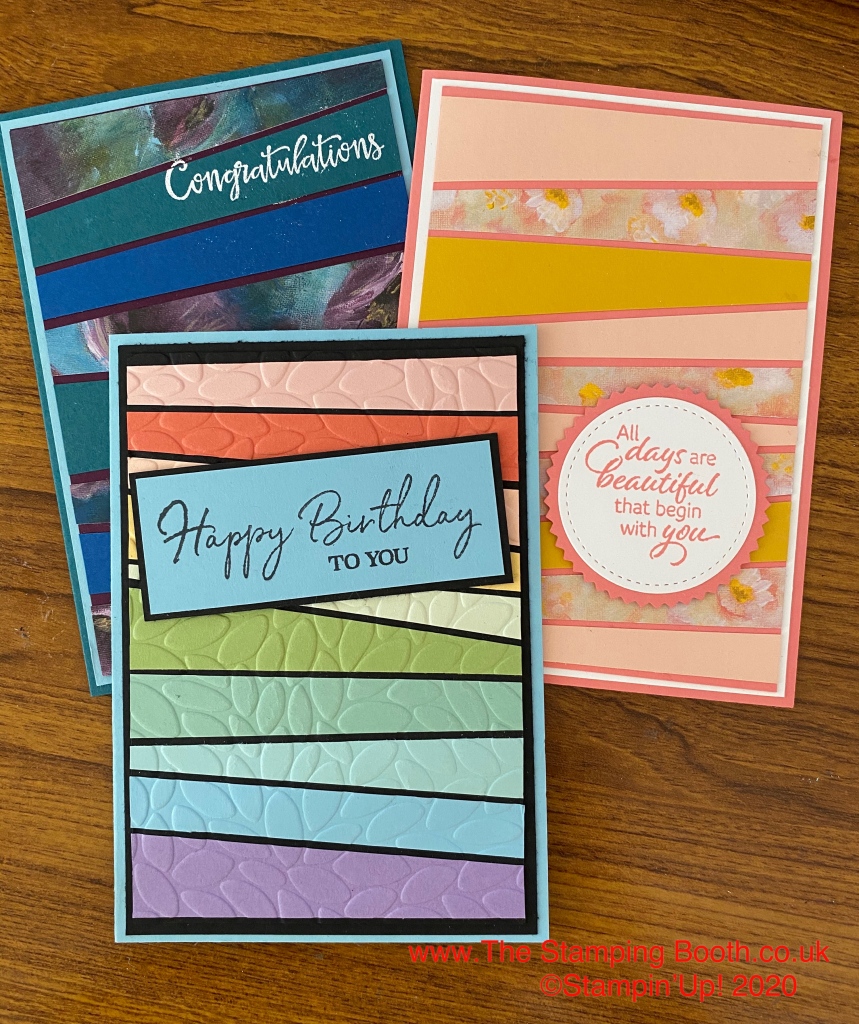
Scrappy Strips technique
cased from Bruno Bertucci
using Perennial Essence DSP and Floral Essence Stampset for sentiment for ‘Congratulations’ card
Perennial Essence DSP and sentiment from Peaceful Moments Stamp set for ‘All days are…..’
Subtles cardstock collection and Happy Birthday to You (SAB SET) for ‘Happy Birthday card
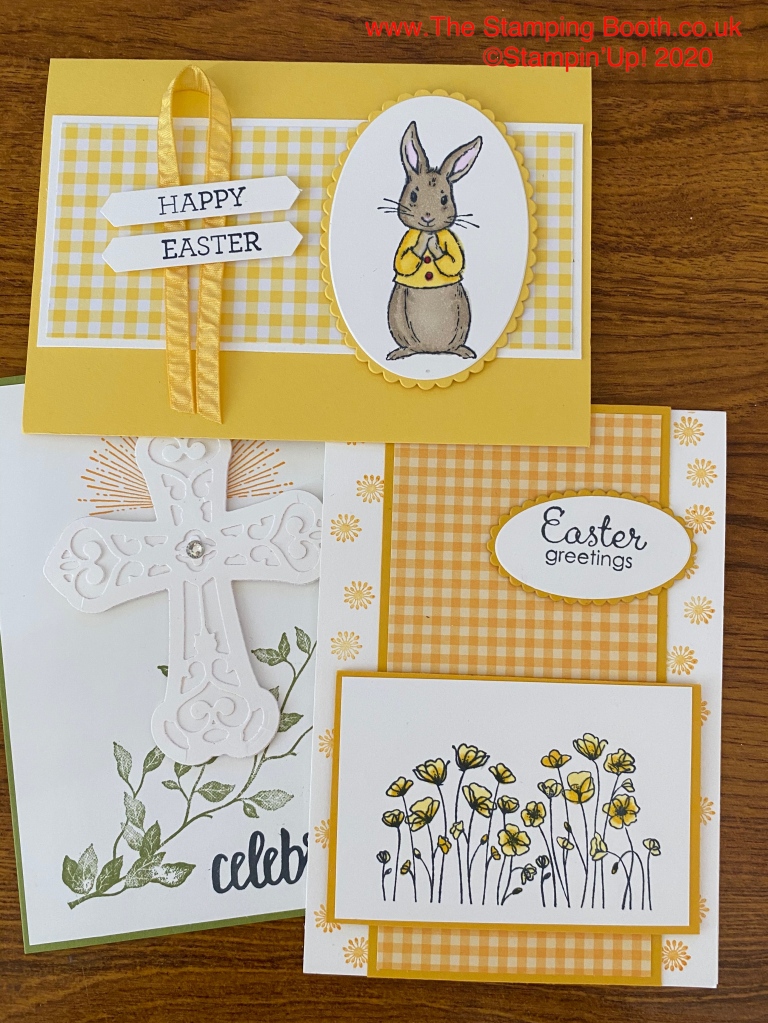
Easter Cards
Fabled Friends, Painted Poppies and Very Versaille Stamp sets used for these three
Tricorn Card
Idea from 2biggirlscrafting.co.uk from a sample given at a Stampin’ Up! convention
My cards used Bonanza Buddies and Family Party
and Best Catch stamp sets
Come Fly with Me!
A spot of masking with Free as a Bird stampset for the first card, and then co ordinating papersfor the second
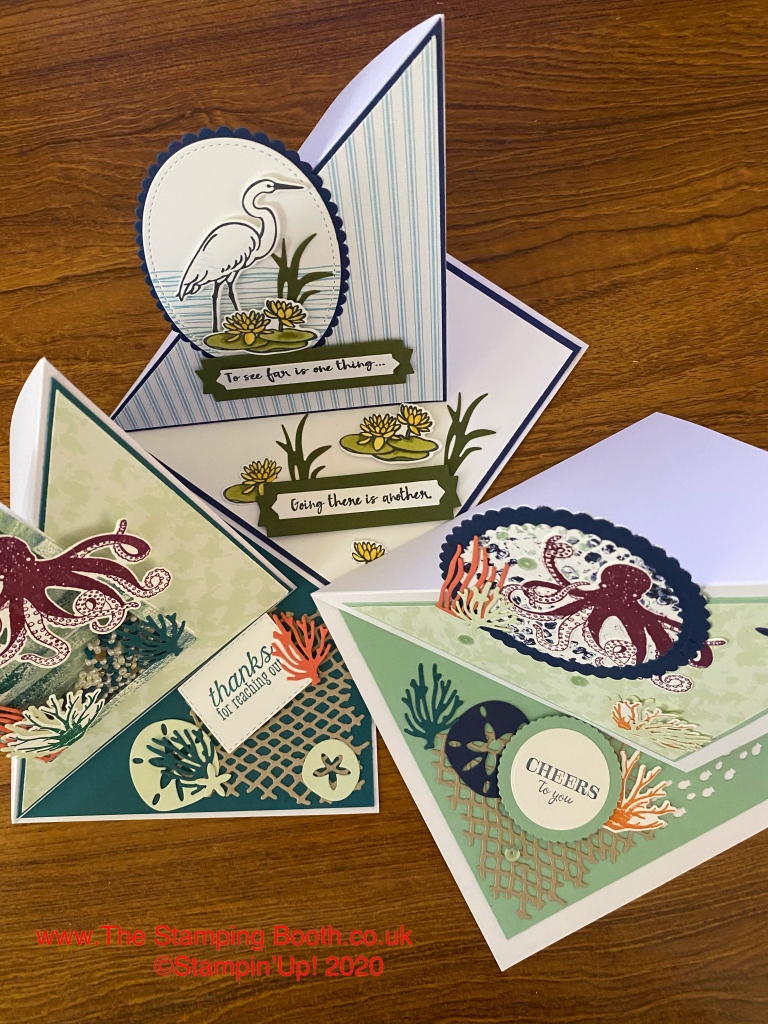
Twisted Easel
Lilypad lake stamps and dies were used for the Egret card
Sea of Textures stamp set and co ordinating (retired) papers were used for the Octopus cards
A lot of Hot Air
Above the Clouds stamp set was used for all of these cards.
Bottom left card used ‘It Starts with Art’ Designer series papers for the balloons. And all used blends for colouring
Impossible Card
Can’t give this card credit to anyone in particular as there are hundreds of versions online, but here’s mine.
Ornate Thanks stamp set and co ordinating dies and papers were used for the floral card, and Geared up Garage stamps, dies and (retired) papers were used for the ‘car’ design
Want to find out more….pop over to The Stamping Booth Facebook page to see how these were made.
Annual Catalogue
January to April Mini Catalogue
Monthly Host Code
If you wish to place an order online with a value between £25 and £150, then please use the host code below;
The code for April 2024 is;
KY94PPWN
Find out more about using a Host code and getting a thank you gift here
Placing an order over £150....do NOT use the host code. Contact me to get even mor rewards
We use cookies on our website to give you the most relevant experience by remembering your preferences and repeat visits. By clicking “Accept All”, you consent to the use of ALL the cookies. However, you may visit "Cookie Settings" to provide a controlled consent.
This website uses cookies to improve your experience while you navigate through the website. Out of these, the cookies that are categorized as necessary are stored on your browser as they are essential for the working of basic functionalities of the website. We also use third-party cookies that help us analyze and understand how you use this website. These cookies will be stored in your browser only with your consent. You also have the option to opt-out of these cookies. But opting out of some of these cookies may affect your browsing experience.
Necessary cookies are absolutely essential for the website to function properly. These cookies ensure basic functionalities and security features of the website, anonymously.
Cookie
Duration
Description
cookielawinfo-checkbox-analytics
11 months
This cookie is set by GDPR Cookie Consent plugin. The cookie is used to store the user consent for the cookies in the category "Analytics".
cookielawinfo-checkbox-functional
11 months
The cookie is set by GDPR cookie consent to record the user consent for the cookies in the category "Functional".
cookielawinfo-checkbox-necessary
11 months
This cookie is set by GDPR Cookie Consent plugin. The cookies is used to store the user consent for the cookies in the category "Necessary".
cookielawinfo-checkbox-others
11 months
This cookie is set by GDPR Cookie Consent plugin. The cookie is used to store the user consent for the cookies in the category "Other.
cookielawinfo-checkbox-performance
11 months
This cookie is set by GDPR Cookie Consent plugin. The cookie is used to store the user consent for the cookies in the category "Performance".
viewed_cookie_policy
11 months
The cookie is set by the GDPR Cookie Consent plugin and is used to store whether or not user has consented to the use of cookies. It does not store any personal data.
Functional cookies help to perform certain functionalities like sharing the content of the website on social media platforms, collect feedbacks, and other third-party features.
Performance cookies are used to understand and analyze the key performance indexes of the website which helps in delivering a better user experience for the visitors.
Analytical cookies are used to understand how visitors interact with the website. These cookies help provide information on metrics the number of visitors, bounce rate, traffic source, etc.
Advertisement cookies are used to provide visitors with relevant ads and marketing campaigns. These cookies track visitors across websites and collect information to provide customized ads.


")
 Cardstock")